We'd almost forgotten what it felt like, but we finally had a nice weekend to get out into the garden! As we've mentioned before, we've gotten a good start on seedlings under the growlight, but we've hardly seen the outdoor garden beds since last fall. So today we headed out back to do a little maintenance and just generally see how things were going. And when we got there, we came upon a few surprises.
That's garlic, popping up through the leaf mulch we put down when we planted last October. We planted 25 garlic bulbs and have spotted 17 sprouts so far. Some of them are already showing a lot of growth, so we'll just have to keep an eye on them until July or so when they'll be ready for harvest.
Next we wandered over to the strawberry bed and cleared off the mulch of straw that allowed them to overwinter. Strawberries can handle a bit of a frost, so even if we get a cold snap they should be okay without the straw. Most of the plants from last year look pretty good, but we've also got some new growth like you can see in the picture. This should be where we get our fruit this summer, so it's encouraging to see it doing well already.
While we were clearing straw, we also removed some from around the rosemary (a futile attempt to keep it alive over the winter). And there, we got some even bigger surprises.
It seems our parsley self-seeded when we left it in the ground at the end of last season.
And so did the oregano...
And apparently the chives! This was kind of an accident, since we simply ran out of time to pull all the plants before the winter arrived. So several boxes still had their crops in them by the late fall, when they went to seed. Sometime this spring, it appears those seeds sprouted, and with no work at all on our part, we have a head start on our herb bed. This is about as natural a gardening process as you can have!
Much less of a surprise was this scene: rhubarb starting to poke up out of the ground. This garden is our first time growing rhubarb, but in our zone it's a notoriously robust and hardy plant. Still, it's always a thrill to see that the roots that lay dormant all winter long survived and are starting to send up new growth.
Similarly for this guy - the very start of an asparagus sprout. Our asparagus is a regular green variety, not one of the purple hybrids, but for some reason it's starting off purple. Our recollection is that it did this last year as well before it eventually turned green, so we're not too worried. Last year we had to let all of our asparagus grow out to ferns undisturbed so it was able to store enough energy to last the winter. This year we should be able to harvest for a few weeks before we let it fern out. That makes seeing the first few tips all the more exciting, knowing they should lead to a harvest.
Now it really feels like the gardening season is starting in earnest! Have you started any plants, or seen any overwintered sprouts? This has to be one of the best times of the year.
Showing posts with label garlic. Show all posts
Sunday, April 7, 2013
Thursday, September 20, 2012
A Sauce of Our Own
One of the many perks of having a plot of fresh produce just outside your backdoor is how easy it is to cook simple, delicious meals. We both enjoy cooking, in pretty much all its forms. There are nights that we want to make something from a fancy recipe, and spend hours in the kitchen rolling roulades, whipping up demi glaces, and scads of other french-sounding culinary tasks. If we're in the right mood, that can make for a whole evening's entertainment. But other nights we just need a simple way to use some of our fresh garden produce.
This has particularly been the case recently, as our planned canning tomatoes have come in bit by bit rather than in one giant harvest. It seems we never have enough at one time to can up, yet if we try to wait for more to ripen, the first few will start to go bad. So why not make up a batch of garden-fresh tomato sauce, not to save, but to eat right away? A tasty sauce, inspired by this find on the internet - roasted tomato sauce from the "Sweet Pea Chef" blog.
We started with two pounds of our sauce tomatoes, romas and a variety called agro. Both of these tend to be meatier than a regular slicing tomato, so you don't end up with a bunch of watery goosh when you cook them. We opted to use some of our older ones as well, just cutting off any parts that looked or felt a bit past their prime. These we cut in half, and placed into sprayed baking dishes, along with a roughly chopped onion, several cloves of smashed garlic, and a couple cut-up carrots (they were small ones). As an added bonus, every single one of those ingredients was grown by us in our own backyard!
We drizzled the pans with a hearty amount of olive oil, then salted, peppered, and threw them into a 350 degree oven for about an hour and fifteen minutes. Hey, we said it was simple; we never said anything about quick! After an hour, the house began to fill with the aromas of roasting tomatoes, and by time we pulled them out, some of the veggies were just starting to blacken a bit and caramelize, like this.
Now you have to resist eating the lovely roasted tomatoes on their own - remember, we want a sauce here. And this is another time where an odd little kitchen tool really comes in handy. Sure, you could blend up the vegetables and probably get a good, smooth sauce. But if you use a food mill, it will separate the slightly tough skins from the now-softened meat of the tomatoes. No tomato skins getting stuck in your teeth, they all get caught in the top of the food mill! Either way, the whole pan's worth - tomatoes, onions, garlic, and carrots - all get pureed through the food mill.
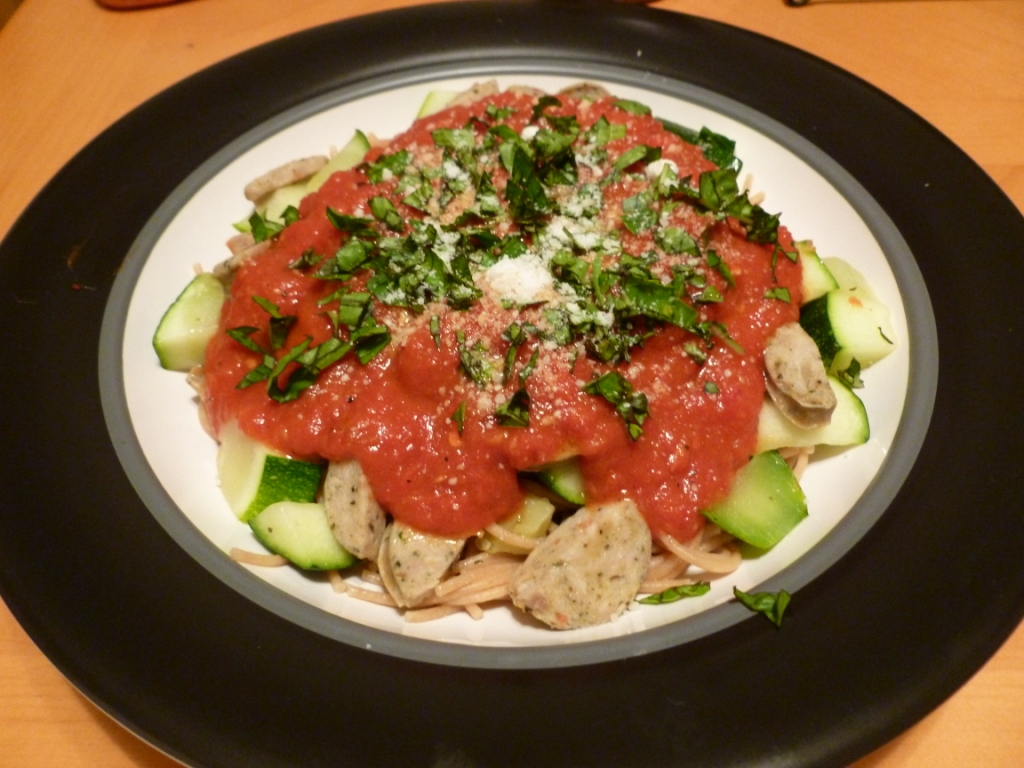
Those skins at the top sure don't look too appetizing, so they go to the compost bin, while we go on to making this into a meal. The sauce is yummy enough on its own that you could use it with noodles if you wanted a basic spaghetti marinara. We wanted to fill it out more into a full meal, so we added a couple cut-up links of chicken sausage, plus some chopped zucchini that we just sauteed in olive oil. Put all that together on top of some spaghetti noodles, grate some parmesan cheese and sprinkle on some fresh basil, and that's a hearty dinner.
Spaghetti with red sauce is never going to earn any Michelin stars or make it into a fancy French cookbook. But it's delicious comfort food, and sometimes it's just what you feel like. We've long felt that food doesn't need to be fancy as long as it's made from quality ingredients. This is a perfect example. We know that the tomatoes, onions, garlic, carrots, zucchini and herbs are grown in a manner we agree with, because we grew them. And short of making our own sausage (eww) or making our own pasta (time consuming), this is about as close to an entirely homegrown meal as you can get. We may have taken some inspiration from a recipe we found online, but this really was a meal we grew ourselves. Not just from farm to fork, we took this from seed to sauce!
This has particularly been the case recently, as our planned canning tomatoes have come in bit by bit rather than in one giant harvest. It seems we never have enough at one time to can up, yet if we try to wait for more to ripen, the first few will start to go bad. So why not make up a batch of garden-fresh tomato sauce, not to save, but to eat right away? A tasty sauce, inspired by this find on the internet - roasted tomato sauce from the "Sweet Pea Chef" blog.
We started with two pounds of our sauce tomatoes, romas and a variety called agro. Both of these tend to be meatier than a regular slicing tomato, so you don't end up with a bunch of watery goosh when you cook them. We opted to use some of our older ones as well, just cutting off any parts that looked or felt a bit past their prime. These we cut in half, and placed into sprayed baking dishes, along with a roughly chopped onion, several cloves of smashed garlic, and a couple cut-up carrots (they were small ones). As an added bonus, every single one of those ingredients was grown by us in our own backyard!
We drizzled the pans with a hearty amount of olive oil, then salted, peppered, and threw them into a 350 degree oven for about an hour and fifteen minutes. Hey, we said it was simple; we never said anything about quick! After an hour, the house began to fill with the aromas of roasting tomatoes, and by time we pulled them out, some of the veggies were just starting to blacken a bit and caramelize, like this.
Now you have to resist eating the lovely roasted tomatoes on their own - remember, we want a sauce here. And this is another time where an odd little kitchen tool really comes in handy. Sure, you could blend up the vegetables and probably get a good, smooth sauce. But if you use a food mill, it will separate the slightly tough skins from the now-softened meat of the tomatoes. No tomato skins getting stuck in your teeth, they all get caught in the top of the food mill! Either way, the whole pan's worth - tomatoes, onions, garlic, and carrots - all get pureed through the food mill.
Those skins at the top sure don't look too appetizing, so they go to the compost bin, while we go on to making this into a meal. The sauce is yummy enough on its own that you could use it with noodles if you wanted a basic spaghetti marinara. We wanted to fill it out more into a full meal, so we added a couple cut-up links of chicken sausage, plus some chopped zucchini that we just sauteed in olive oil. Put all that together on top of some spaghetti noodles, grate some parmesan cheese and sprinkle on some fresh basil, and that's a hearty dinner.
Spaghetti with red sauce is never going to earn any Michelin stars or make it into a fancy French cookbook. But it's delicious comfort food, and sometimes it's just what you feel like. We've long felt that food doesn't need to be fancy as long as it's made from quality ingredients. This is a perfect example. We know that the tomatoes, onions, garlic, carrots, zucchini and herbs are grown in a manner we agree with, because we grew them. And short of making our own sausage (eww) or making our own pasta (time consuming), this is about as close to an entirely homegrown meal as you can get. We may have taken some inspiration from a recipe we found online, but this really was a meal we grew ourselves. Not just from farm to fork, we took this from seed to sauce!
Saturday, July 21, 2012
Our Long-Awaited Garlic Harvest
If you do much cooking at home, one thing you're sure to use a lot of is garlic. So many recipes call for a clove or two of minced garlic, and even those that don't could often use a little. Fortunately, growing garlic in the home garden is incredibly easy! You may recall that last October we planted a few dozen garlic cloves that we'd ordered online. We covered them up over the winter, then pretty much ignored them until a few weeks ago.
At that point, the garlic stalks had lost most of their green color and began to look very droopy and dried out. That's your sign that they're ready for harvest. You don't need the whole stalk to be brown and dry; just most of the lower stalks. When we decided to pull ours out, they looked like this.
To harvest garlic, just grab a firm hold of the stalk, close to ground level, and pull the whole thing out. Hopefully they've been growing for the last 9 months, and you'll get something that looks like this.
We had a bit of variation in bulb size in our harvest. Some bulbs were large with lots of nicely formed cloves, but some of the others were a little disappointing. This likely had to do with the soil in our garden box. We planted the garlic first (last fall), before we'd done much to amend the soil. As a result the soil was somewhat dense and clayey, which is not ideal for garlic. It much prefers a loose, fluffy soil with plenty of composted manure. This is something we plan to improve for next year's harvest.
With that much garlic - a whopping 25 bulbs - it's really important to be able to store it for a long time. We chose to grow a hardneck variety which doesn't typically keep as well as the softneck types, but we preferred its flavor and size of cloves. Even so, the proper curing technique can make any type of garlic last for several months. First, they need to be hung in a in a cool, dry place with good ventilation. We bundled a few stalks together and draped them over a conduit running through our basement, then repeated until we'd hung it all.
We let things stay in this state for about three weeks to ensure the garlic had fully cured. We had to watch our heads when walking through the basement, and it smelled pretty pungent for a while. After three weeks we took them down and trimmed the bulbs. The stalks were cut off an inch or two above the bulb, and the roots snipped off almost entirely. Then we used a soft brush to clean off any remaining dirt. Some of the very loose papery outer layers also came off, but as long as it was just a little bit, that was fine too. When we were done, we had a beautiful looking pile of garlic!
As much as we'd like to use every last clove, we do plan to set aside a few of the best looking bulbs to plant this fall. It's tempting to plant the smaller ones so you can use the big ones in your cooking, but it's really wise to plant something that has the characteristics you want to propagate. We want big garlic bulbs in the future, so we'll save a few of the biggest and best to plant.
We're storing our garlic in brown paper bags in the basement. The basement will keep them cool and dry, and the bag will ensure that they also stay in the dark. If garlic bulbs see too much light, they will want to sprout, which we certainly don't want to happen right now. With previous years crops of Georgian Crystal given to us by Greg's Dad, we've been able to keep them this way until Christmas or beyond.
Garlic was one of the easiest and most rewarding crops we've grown yet. We're already starting to think about where we'll be planting the next crop this fall. And probably munching on some homemade garlic bread while we do!
At that point, the garlic stalks had lost most of their green color and began to look very droopy and dried out. That's your sign that they're ready for harvest. You don't need the whole stalk to be brown and dry; just most of the lower stalks. When we decided to pull ours out, they looked like this.
To harvest garlic, just grab a firm hold of the stalk, close to ground level, and pull the whole thing out. Hopefully they've been growing for the last 9 months, and you'll get something that looks like this.
We had a bit of variation in bulb size in our harvest. Some bulbs were large with lots of nicely formed cloves, but some of the others were a little disappointing. This likely had to do with the soil in our garden box. We planted the garlic first (last fall), before we'd done much to amend the soil. As a result the soil was somewhat dense and clayey, which is not ideal for garlic. It much prefers a loose, fluffy soil with plenty of composted manure. This is something we plan to improve for next year's harvest.
With that much garlic - a whopping 25 bulbs - it's really important to be able to store it for a long time. We chose to grow a hardneck variety which doesn't typically keep as well as the softneck types, but we preferred its flavor and size of cloves. Even so, the proper curing technique can make any type of garlic last for several months. First, they need to be hung in a in a cool, dry place with good ventilation. We bundled a few stalks together and draped them over a conduit running through our basement, then repeated until we'd hung it all.
We let things stay in this state for about three weeks to ensure the garlic had fully cured. We had to watch our heads when walking through the basement, and it smelled pretty pungent for a while. After three weeks we took them down and trimmed the bulbs. The stalks were cut off an inch or two above the bulb, and the roots snipped off almost entirely. Then we used a soft brush to clean off any remaining dirt. Some of the very loose papery outer layers also came off, but as long as it was just a little bit, that was fine too. When we were done, we had a beautiful looking pile of garlic!
As much as we'd like to use every last clove, we do plan to set aside a few of the best looking bulbs to plant this fall. It's tempting to plant the smaller ones so you can use the big ones in your cooking, but it's really wise to plant something that has the characteristics you want to propagate. We want big garlic bulbs in the future, so we'll save a few of the biggest and best to plant.
We're storing our garlic in brown paper bags in the basement. The basement will keep them cool and dry, and the bag will ensure that they also stay in the dark. If garlic bulbs see too much light, they will want to sprout, which we certainly don't want to happen right now. With previous years crops of Georgian Crystal given to us by Greg's Dad, we've been able to keep them this way until Christmas or beyond.
Garlic was one of the easiest and most rewarding crops we've grown yet. We're already starting to think about where we'll be planting the next crop this fall. And probably munching on some homemade garlic bread while we do!
Friday, June 1, 2012
May Harvest Update
As we were scurrying about this morning getting ready to leave for our day jobs (not farming), Greg glanced out the back window and was greeted with this view. Our garden always seems bucolic and peaceful, but on this crisp morning it just looked so nice we had to stop out and visit for a few minutes.
Most of the plants - those that haven't been attacked too badly by our neighborhood rabbits - looked very good. Our broccoli is starting to form heads, which is a really encouraging sign. Two years running we've lost our entire broccoli crop either to bolting or to animals, so we're excited about any possible harvest. We haven't gotten any yet, but we're hopeful.
The one area where we have been harvesting quite a bit is our greens and radish box. This box was planted with 1/3 spinach, 1/3 radishes, and 1/3 various lettuces. By now all the radishes have been pulled, but the others are still going strong. From the start of the season up to the end of May, we've harvested:
- 70 radishes, each about 0.6 ounces, for a total of 2 lb 10 ounces
- As many radish greens as we cared to eat; the rest went to compost
- 5 ounces of garlic scapes, the flavorful shoots that appear in the spring
- 1 lb, 10 ounces of baby leaf spinach
- No significant lettuce or mache
Now, you can see there is plentiful lettuce growing here, but we've chosen so far not to harvest it. Based on a few nibbles here and there, we've discovered that our leaf lettuces are incredibly bitter! Some quick internet research seems to indicate that it's either soil nutrient deficiencies or inconsistent watering, but we're just not sure yet. Any experience our readers have in growing lettuce that isn't spit-it-out bitter would be greatly appreciated.
Oh, and our chickens haven't produced a thing for us yet, but they are still really cute and fun to play with. They love to eat the plentiful clover that grows in our yard, and they trust us now enough to eat it right out of our hands.
All told it's not a ton of food just yet, but we can see that a lot of plants are getting close to harvest stage. The broccoli we mentioned, as well as kale and snap peas, should be ripe within a week or two. Plus we've been eating spinach and radishes in almost every home-cooked meal this month, from salads and sandwiches to spinach pizzas and oven-roasted radishes. They taste great, we know they've been naturally grown, and we eat them fresh-picked straight from the earth.
How's your garden looking so far this year? Hopefully it's been a bountiful harvest all around and it continues into the rest of the gardening season.
Most of the plants - those that haven't been attacked too badly by our neighborhood rabbits - looked very good. Our broccoli is starting to form heads, which is a really encouraging sign. Two years running we've lost our entire broccoli crop either to bolting or to animals, so we're excited about any possible harvest. We haven't gotten any yet, but we're hopeful.
The one area where we have been harvesting quite a bit is our greens and radish box. This box was planted with 1/3 spinach, 1/3 radishes, and 1/3 various lettuces. By now all the radishes have been pulled, but the others are still going strong. From the start of the season up to the end of May, we've harvested:
- 70 radishes, each about 0.6 ounces, for a total of 2 lb 10 ounces
- As many radish greens as we cared to eat; the rest went to compost
- 5 ounces of garlic scapes, the flavorful shoots that appear in the spring
- 1 lb, 10 ounces of baby leaf spinach
- No significant lettuce or mache
Now, you can see there is plentiful lettuce growing here, but we've chosen so far not to harvest it. Based on a few nibbles here and there, we've discovered that our leaf lettuces are incredibly bitter! Some quick internet research seems to indicate that it's either soil nutrient deficiencies or inconsistent watering, but we're just not sure yet. Any experience our readers have in growing lettuce that isn't spit-it-out bitter would be greatly appreciated.
Oh, and our chickens haven't produced a thing for us yet, but they are still really cute and fun to play with. They love to eat the plentiful clover that grows in our yard, and they trust us now enough to eat it right out of our hands.
All told it's not a ton of food just yet, but we can see that a lot of plants are getting close to harvest stage. The broccoli we mentioned, as well as kale and snap peas, should be ripe within a week or two. Plus we've been eating spinach and radishes in almost every home-cooked meal this month, from salads and sandwiches to spinach pizzas and oven-roasted radishes. They taste great, we know they've been naturally grown, and we eat them fresh-picked straight from the earth.
How's your garden looking so far this year? Hopefully it's been a bountiful harvest all around and it continues into the rest of the gardening season.
Tuesday, March 13, 2012
We're Off And Growing!
That's right, our urban farm is really starting to show signs of growth. And in more ways than one. Let's just say that it was a very busy and active weekend; so much so that it's taken til Tuesday night to find time to write about it! To start with, we headed back to our garden area and found these beautiful green shoots coming up out of the ground.
Those are from the garlic we planted last fall. We planted two varieties, and so far every single clove of Georgian Crystal has some leaves poking up through the mulch. Strangely, not one of the Chesnook Reds has appeared yet, but different types of a plant can have different times to germinate. No need to panic yet, and if nothing else, we're looking at 25 heads of garlic minimum, if we can get them through the growing season. They don't need any maintenance so far, but it won't be too long before they generate long stalks (scapes) that we'll have to trim back. For now, we just wait.
Next we headed over to the cold frame we built, for our cold season crops. It's been a weirdly warm spring so far, so it was over 65 degrees outside when we lifted up a glass pane to check the temperature within.
It might be a little hard to see on the photo, but that's our thermometer reading nearly 100 degrees! It was actually 110 when we first looked, but we lost a little bit of temperature while taking the picture. And honestly, that's fine. 110 degrees is way warmer than we needed for our first few veggies of the year, so we took one of the panes off to vent a little bit. Since it's going to be in the mid-to-high 70s all this week, we'll keep that panel off so we don't cook our seeds. If it were a more typical spring, we'd probably need the glass to capture some heat during the day so things don't freeze overnight.
Even though it's unseasonably warm, we're still starting with cold-hardy crops. It's March in the Midwest; for all we know it could still snow again! For that reason, we stuck with the early season basics in our cold frame.
Spinach, from Burpee, an old packet from the year we first started gardening. Some radishes we nabbed at a bigbox store a few years back. And that guy in the middle is a newcomer. Mache, also known as corn salad, is a supremely hardy salad green that you can supposedly grow well into the winter. Neither of us has ever eaten it before but it really sounded like a good option to try. And we found seeds from Botanical Interests, a neat family owned seed company that prominently refuses to use genetically modified plants. We're eager to see how they turn out.
We planted these seeds into a third of the cold frame box and gave them a good drink of water. The idea is to wait a week or two before planting the next third, and so on for the final portion. If all goes as planned, the harvest times should then be staggered as well, and we'll have a longer window in which to eat all our produce.
So there you have it. We're now up to five types of vegetables that have either sprouted or at least been planted. Garlic, broccoli, spinach, radishes and mache. That sounds like the start to a pretty tasty meal, and it was a good accomplishment for the weekend to get it all going. But believe it or not, that wasn't our main task of the past few days. There was also quite a bit of construction going on. Stay tuned later this week for an update on some pretty significant groundbreaking. Being an urban farmer sure keeps you busy, but it should all be worth it as our plants (and plans) continue to grow!
Sunday, October 30, 2011
A Spook-tacular Time to Garden
The leaves are starting to fall, there’s a chill in the air and pumpkins are showing up on doorsteps everywhere. That can mean only one thing: vampires! Sorry, got a little sidetracked there. What it actually means is it’s time for gardening!
I know what you’re thinking. Gardening in the fall? Isn’t it the wrong time of year for that? If we were starting tomatoes or peppers, that would be absolutely correct. But this is just the right time to start on one crop.
It’s garlic! Gosh, we love garlic. It goes into most any recipe you might be cooking, tastes great as garlic toast, and is believed to aid in digestion (and repel vampires). There’s almost nothing we make that isn’t made better by the flavorful kick of garlic. And if you grow your own, you can fine-tune that kick to just the way you like it.
You see, there are far more varieties of garlic than what you find at your local grocery store. We’ve been fortunate that Greg’s Dad has experimented with many different varieties of garlic (providing us with wonderful samples), so we’ve been able to home in on one that we really enjoy – Georgian Crystal. It’s got some fire to it but not too much, and it breaks into really good-sized cloves.
This is a hardneck variety, so named because of a long stalk which it sends out in the spring. The alternative is softneck, which you’ve probably seen in the grocery store. There are pros and cons to each type, which are detailed nicely on this cool publication from Iowa State University Extension. For us, we know a hardneck will do well in Iowa and we love the flavor of Georgian Crystal, so we’ll use that for our first go-round. We bought ours online from wegrowgarlic.com, a Wisconsin garlic farm.
Starting garlic is pretty easy, since most of the first part of its life is over the winter. After you break each bulb into cloves, plant the cloves pointed end up about an inch deep in loose, well-draining soil. Typical recommendations are to space them about 3 to 5 inches apart from one another. Then you cover the entire garlic bed with an insulating material, like straw or shredded leaves. Cover them with four to six loose inches, and then you can pretty much leave them alone until spring! Here’s what our garlic box looked like just after planting.
This is our first time planting garlic, so hopefully it all goes according to plan and by this time next year we’ll be enjoying homegrown garlic from our own backyard. And if we’re able to keep those pesky vampires away, well that’s just a bonus.
Subscribe to:
Posts (Atom)