For this being a blog about farming, we haven't actually done much farming yet on our urban homestead. Part of that is just the unfortunate timing of finding our dream house/lot at the end of fall. We hurried to put in a garlic bed, but since then we've just been waiting and planning. Well, this "false spring" weather we've been having finally kicked our butts into action. So this weekend we built our first cold frame.
Folk wisdom in Iowa holds that you plant your cold-hardy crops a few weeks before the last frost, typically sometime in April. That felt like way too long to wait, but luckily there are ways to extend the growing season. We already knew about some of the more complicated ones, like greenhouses and high tunnels, but only recently discovered how easily we could build a similar structure for our raised beds.
A cold frame works on the same principles as a greenhouse; it shelters the plants and uses clear panels to let in sunlight and trap heat. In this sense it truly is solar powered - you don't need to add any external heat source to see a double-digit temperature increase inside the box. Combined with our recently obtained $5 windowpanes from the ReStore, this project was just too tempting to resist!
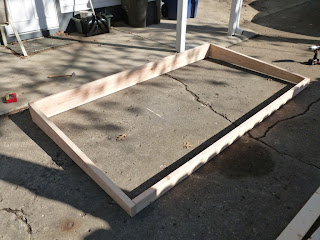
We started by building a wooden box. We've already done this several times with our raised garden beds. But this one needed to have a slight angle to it. Cold frames are designed to face South to capture as much sunlight as possible, so the Southerly side is about 4 inches shorter than the North. We cut the front and back to length, then made a long diagonal cut along the sides to taper from 4 to 8 inches in height. Since our three windows wouldn't cover our desired 4x8 raised bed, we also cut a few boards to fill in the empty spaces. All laid out, it looked like this:
We used a few screws in each corner to build our perimeter. As-is, the angle of the sides doesn't match up with the vertical boards of the front and back very well, so our windows wouldn't have a good snug fit. The best way to have the windows sit flush is to build the perimeter on a flat surface as we did here, then flip it over so the angles match perfectly. For more on this, and on cold frames in general, check out the very informative Four-Season Harvest by Eliot Coleman. We followed his plans almost exactly here, and are thrilled with our results.
The spacers we used aren't structural, so we just tacked them in with a few nails at each end. We needed them because we built the cold frame to match our "standard" raised bed size, even though we didn't have eight feet of windows. We had enough glass to cover most of the cold frame, so we knew the wooden spacers wouldn't have too much of a shading effect. As the sun travels across the sky, these small shadows will be cast on different parts of the bed, so there should be plenty of light for all the plants.
From here it was simple to place the cold frame on top of one of our garden beds, and insert the windowpanes. The cold frame isn't attached to the bed, so we'll be able to move it around the garden to whichever area needs extra heat. Early on, that means we can start spinach and radishes a few weeks ahead of schedule. Once they're established, we can move the frame to get a jump start on tomatoes and peppers. Then in the fall, we can repeat with greens or move on to root vegetables. It should be useful virtually the whole season long!
We put in the cold frame this afternoon, and a few short hours later it was already 15 degrees warmer inside the frame than it was outside. Our particular cold frame might need a few tweaks to really amp that up. At the moment it overhangs the front and back of the garden bed, just because of the height of the windows. That's a route for warm air to escape, so we'll probably try to add some boards to close the gaps. The cold frame should make a big difference in our garden, and it only took us about a day to build. Now if we can find more inexpensive windows, we might just need to build a few more of these!


No comments:
Post a Comment