Wednesday, December 21, 2011

Homemade Apple Butter: Part One

When you've had a good year in the garden, you often can't come close to using up all the produce you've grown. You can try eating Swiss Chard for breakfast, lunch and dinner, but even then you could end up falling behind an overly enthusiastic plant. It would be a real shame to waste this perfectly good food, so when faced with this situation, we turn to preserving, meaning canning or freezing.

Now, as we've well documented, this hasn't been a particularly stellar year in our garden, what with the moving process, the small space allotment we had, and the combination of theft by others and neglect by us. But just because we had a small harvest doesn't mean that everyone else in central Iowa did. One of the many successful growers in our area this year was Iowa Orchard, a neat little fruit oasis in the middle of the Des Moines suburbs.

We're a little ways beyond apple season here in Iowa by now, but we did our best to take advantage of it while it was going on (from July to October, per Iowa Orchard's website). We picked up several pecks of apples over the fall, many for fresh eating, but one peck of Cortlands was specifically earmarked for apple butter.


If you've never had apple butter, first of all, give it a try; it's delicious! But secondly, it's a fruit butter, which is a lot like a jam, but spreads much easier. You can make and preserve it at home with a few simple tools, as long as you follow the right procedure. That is of the utmost importance, since improper canning can make you quite sick or even be fatal. You can follow our process here as a general concept, but make sure you have a trusted manual to ensure you follow the right safety procedures. A good bet is the Ball Blue Book, which we used for our recipe here. Just be careful, and home canning can be perfectly safe.

With that disclaimer stated, the first step in making apple butter is basically to make homemade applesauce, or a nice apple puree. Our recipe called for four pounds of apples to make a half dozen jars of apple butter. We weighed our peck to be about 10 pounds, and it ended up making 14 jars (two separate batches), which is about the same proportion. These needed to be peeled and cut into pieces, which you can do by hand... Unless you have an Apple Master!

It peels!

It slices!

It dices... er, cores!

Our Apple Master was a find at the local TJ Maxx, which made it a reasonable bargain, especially considering that we planned to continue making apple butter in our futures. It helps, but it's not necessary; you can just peel with a knife and then cut into pieces. The apples went into a big pot with 2 cups of water per 4 pounds of apples, where they simmered on the stovetop until soft, somewhere between 10 and 15 minutes maybe. You'll be able to tell when the apples soften, so you likely won't need to time it.


Next we put the softened apples into our second gadget of the process: a food mill. This step could be done in a regular food processor, but it doesn't work quite as well. If you plan to make apple butter semi-regularly, we'd recommend you invest in the food mill. It basically presses the apple slices through a grate in the bottom, which also serves to strain out any skins or tough parts that didn't get Apple Mastered away. A food processor wouldn't have that filtering ability, plus there's the danger that it's too powerful - liquefying the apples instead of making a puree. And it's just so much fun, in an old-fashioned kind of way, to crank away at the apples and watch the mush drip through the bottom.


If you want to make your own applesauce, congratulations, that's pretty much what you've got here! It hasn't been seasoned in any way, and it's still a little too squishy to spread onto toast, so it needs a little more work to become what we want. Come back next time and we'll show you the rest of the journey, where it transforms from puree into the thick, amber goodness of apple butter. We'll also break out the canner, and (very carefully) pack it into shelf-stable jars we can enjoy for months to come. See you then!


Thursday, December 15, 2011

What it All Boils Down To

Mo' fat, mo' flavor.

These four simple words, spoken by Chef Ryan Dowie, quickly became a catchphrase of sorts for those of us studying under him. If he threw a full stick of butter into a pot during class, a chorus of "mo' fat, mo' flavor" would quickly resound from the audience. But maybe we're getting ahead of ourselves...

A good starting point would be to introduce Chef Dowie and explain how the heck we even know who he is. As far as we last knew, he's the head chef at the Waterfront Restaurant in Des Moines, and a part-time instructor at the Iowa Culinary Institute, part of the Des Moines Area Community College. DMACC, as it's known, has a fairly highly regarded culinary program, to the extent that there's a waiting list to even get in to the degree program. Fortunately, they also offered a one-semester seminar course to casual, "non-career" chefs. Last fall, Greg took the class.

Over the course of the semester, we moved from the basics, through soups, salads and breads to the various meats and more, learning the proper preparations for each. But one of the most lasting lessons occurred in the early weeks of the class, and it came in handy again tonight.


Any ideas what we're making out of this? Let's see: bay leaves, pepper, thyme, celery, onions, garlic, carrots, and... a bunch of empty shrimp shells? That's right, baby, we're making stock!

Homemade stock is great - it's as versatile as the boxed stuff, but you get to control exactly what goes into it, so no MSG, preservatives, or other junk. Plus it tastes so much better, and it's a breeze to make. We'll often make chicken stock with leftover carcasses; shrimp is a little less common, but we had been saving shells from several meals-worth of shrimp. Shells come free with the shrimp, so it seems a shame not to use them for something.

The first step is to chop up the vegetables. The good thing here is that the chop can be pretty coarse, since it will be simmering for quite a while (even more so with chicken and beef).


Some folks will just throw these into a stockpot with boiling water, but we prefer to sautee them about 5 minutes or so first. It releases some of the flavors, and it's how Chef Dowie taught it, so who are we to argue? We sauteed in butter, but you could use an oil if you prefer.


We also sauteed the shells for a bit, to start releasing some of their flavorful oils.


 We did this for maybe a minute or two, then added two quarts of water, plus the 2 bay leaves and a small palmful each of pepper and thyme. We don't add any salt at this point, because it's easy to overdo it. As the stock cooks, liquid evaporates off, so the salt could get really concentrated. It's best to just salt at the very end, once the stock is pretty much done.

Then comes the really easy part of making stock. Bring it to a boil, lower it to a simmer, then go watch an episode of your favorite TV show! Well, you can do whatever you like to fill that time, but you're free for about an hour while the stock does its thing, pulling flavor from the ingredients into the liquid.


About this time, you'll probably start to notice that your stock is becoming fragrant, and has taken on a much richer color. Yum! Seeing soup in your future? Only a few steps to go. Now we need to filter out the pieces. All their flavor has gone into the liquid by now, so they're pretty much used up (and ready for the compost bin). We strained through a cheesecloth and a mesh strainer. Be sure the bowl you're straining into is big enough to hold all the liquid.


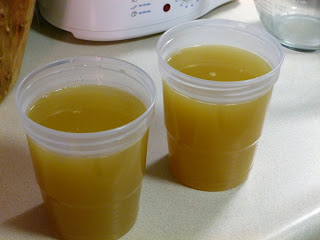
And there it is. Just over an hour, and we've gone from discarded shells to a lovely shrimp stock. We're not planning to use it immediately, so we poured ours into a couple of freezer containers for another day.


Now we're all set to make a shrimp bisque sometime, possibly a gumbo, or maybe some sort of seafood risotto. The possibilities are almost limitless. And it'll feel good to use, knowing we made it ourselves.

This same basic procedure will work for any sort of stock, though the simmering times will vary. Veggie is the shortest, from about 30 to 45 minutes, chicken should go for a few hours, and beef is kind of an all day project. We hope you'll keep this idea in mind next time you're peeling shrimp, or have some leftover bones!

Saturday, December 10, 2011

Thinking Outside the (Big)Box

If you were to take a walk through the produce department of your local grocery store, you'd probably find neatly stacked (I would know, I used to stack them -Greg), perfectly uniform towers of various different fruits and vegetables. Apples and oranges, carrots and cucumbers. But unless you're at a specialty grocer, you might not find something that looks like this:


Any ideas what this guy could be? Well, don't feel bad if you don't know; we hadn't heard of delicata squash either until our friend Sarah did a squash taste test a few weeks back and declared delicata the winner. The delicata is frequently referred to as a winter squash, like butternut or acorn, but it's actually more closely related to the zucchini. It came highly recommended, and like other squashes is chock-full of fiber and nutrients like potassium, magnesium and vitamins B & C. With this knowledge in mind, we made a point to keep an eye out for delicata as we shopped.

Fortunately for us, Gateway Market in Des Moines frequently sources produce from local suppliers, and we were able to pick up a few delicata squash that were grown in Murray, Iowa, just about an hour from home. You might remember our adventures in squash cooking haven't been terribly reliable lately, so we decided to keep things simple this time around. It doesn't get much simpler or more classic than slicing in half and removing seeds, throwing in a few pats of butter and some brown sugar, then roasting at 350 F for about an hour. And the result looks so delicious, doesn't it?


Once the squash were cooked, Stacia scooped out the flesh while Greg pan-seared up a couple of pork chops with some rosemary and thyme and whipped up a quick pan sauce. Altogether, it made for a delicious, hearty dinner, perfect for a chilly December evening.

This is one of the most exciting things about growing your own food or shopping locally grown produce. The variety is virtually endless, far beyond the handful of options that are commercially produced. If you go to the store, you'll find tomatoes, but if you leaf through a seed catalog, you can find literally hundreds of different kinds of tomatoes, all with different characteristics: size, shape, color, flavor, texture, etc. Growing food in the garden puts all those choices into your hands, for unrivaled culinary freedom. And you just might discover a flavorful new squash you've never tried before.

When you're able to find such interesting, high-quality ingredients, a simple preparation can lead to a really tasty meal!


Monday, December 5, 2011

Breaking It All Down

This is going to be a totally rotten post. Ok, maybe it's just the topic that will be rotten. A few posts back, we told you about that lovely pastel compost bin made of dumpster fodder. Now it's time to talk about filling it up, and letting it rot.

First, a couple of composting basics. Compost is formed by the process of decomposition. During this process, bacteria that are found in nature feed on organic materials and turn them into humus, a fluffy, crumbly dark brown soil-like material that improves soil structure and moisture retention. Our goal then is to create an environment that will allow these bacteria to thrive. So what do the bacteria need? It's actually pretty simple: food, water, and air.

There are two basic types of food that any compost pile needs, commonly referred to as browns and greens. Browns are carbon-rich ingredients like dried leaves, cardboard, sawdust, wood chips, etc. Greens are nitrogen-rich ingredients like kitchen scraps, grass clippings, garden weeds, used coffee grounds, etc. A good compost bin needs the right mixture of both of these food sources. Bacteria really feast on the green material, but they need a good balance of brown material to keep the pile aerated. A pile with too much "brown" material won't decompose very quickly, but a pile with too much "green" material can get stinky. It may take some practice to get the balance right, but many internet sources suggest a ratio of 2:1 green to brown material by volume is a good starting point.

Greens: weeds, kitchen scraps, mushy Jack-O-Lanterns, and coffee grounds.

Browns: Shredded fall leaves.


The water part of the equation is much simpler. Don't keep the pile sopping wet, but don't let it dry out either. A good compost pile should be as moist as a wrung out sponge. Some people cover their compost bin with a tarp or scrap of carpet during the hot summer months to keep it from drying out.

And the final ingredient is air. You'll remember that we liked the used shipping pallets because they would allow air to flow between the slats. A good supply of air will allow your pile to grow lots of aerobic bacteria. These bacteria will quickly break down the material into fluffy humus and leave a pleasant, earthy smell. If the pile doesn't get enough air, the decompostion will be slow and you can start to notice a stinky rotten odor, caused by anaerobic bacteria. One of the best ways to incorporate air into your compost is to turn the pile with a pitchfork. The more often you turn a compost pile, the faster it will break down. It's a good idea to turn the pile at least every 7 to 10 days.

So there's the rundown of how to make compost. We've got to thank the folks over at Home Composting Made Easy for our rotten education. If you're interested in starting a compost bin of your own, you should definitely check our their website.

But how are we doing so far? Well, it could be better. We're pretty happy with our initial ratio of browns and greens, but we haven't been diligent about turning the pile or keeping it moist. We could probably also increase our bacterial growth if we added more material to the bin. We'll keep working at it, and we'll be sure to post more updates along the way!

Wednesday, November 30, 2011

Going Whole Hog

Believe it or not, there are a few things that you simply can't grow/raise on a half-acre urban farm. We're willing to push the limits on some unconventional backyard additions, but neither the city of Des Moines nor our consciences would allow us to try to keep pigs, for example. When that happens, you do the next best thing - find a small (non-urban) farm that you know and trust, and buy your beef, pork, etc there. That's what we do during the farmers market season, albeit in a piecemeal manner. Need pork chops? Buy a pack or two. Short on chicken breasts? Pick up a few pounds. But winter is coming, and with it, a long cold stretch with no markets.

Which brings us to the exciting electronic arrival that came while we were out of town for the holidays. Confirmation and instructions for our purchase of half a hog! Maybe we neglected to tell you all, but when we went To Market, To Market a few weeks back, one of the things we did was Buy A Fat Pig! To be more specific, we put down a deposit on a half hog from Crooked Gap Farm. Crooked Gap is a small farm not far from Des Moines that is owned by a couple relatively new to the farming trade, and who we could have visited this summer if our schedules had worked out better. They raise heritage breeds of pork, much unlike the bland mass-produced kind found in stores, and have a strong focus on the welfare and happiness of the animals. A perfect match for us! Oh, and we've purchased individual cuts of their pork at the farmers market this summer, and it's delicious, so that helps too.

Now if you're a city slicker like Greg, you might hear "half hog" and imagine an entire pig sliced in half (no joke, that's kind of what I thought -G). Not to worry, all it means is that the farmer takes the pig to the meat locker to be processed normally, and all of the meat from one half of the pig is ours. It will come in neatly wrapped white paper packages, which hopefully will fit into our chest freezer without overflowing.


So, why buy a half hog in the first place? If we wanted to stock up, we could have tried to buy a bunch of packages of individual cuts to last us through the winter. But that's not really sustainable, and it's not great for the farmer. Sure, everyone loves pork chops, but the farmer isn't raising chops; he's raising pigs. So if everyone just buys chops, there's a lot of perfectly good meat that isn't being sold and could be going to waste. Think about it next time you're at the meat counter and see those rows and rows of nice pink pork chops. Where's the rest of all those pigs? Whole (or half) hog is win-win. The farmer sells an entire hog, and in return we get a pretty favorable price compared to just buying hundreds of pork chops. Which brings us to the exciting arrival this week.


Crooked Gap breaks down the hog by section, then lets us choose how each section is processed and cut. For example, in the loin area, we can get the entire loin, or it can be cut into roasts, chops, or tenderloins. Same for all the other parts of the pig: shoulder, ham, ribs, and side (meaning bacon!). Most of these cuts we know pretty well, but some are things we've never tried. Then there's all the parts we'll call "less desirable." Buy purchasing the hog as a half, we can receive pieces like hocks, heart, liver, jowls and lard. What on earth do you do with a pork heart, or liver? We don't know, but it sounds like it might be worth exploring. This half hog could be a big crash course in many new ways of cooking. We'll try to be like the proverbial Indians using every part of the buffalo, and document our adventures here.

If any of that offal stuff (hahaha) bothers you, you can still buy a half hog and respectfully decline the organs. You'd still be doing a service to the farmer by buying some of the less popular cuts and you'll expose yourself to some delicious new flavors; shoulder roast carnitas anyone? Who knows what the next pork-y discovery will be? The farmer says jowls taste like bacon, and it's hard not to be excited to try that. We may never be able to raise a hog in our backyard, but this comes pretty close!

Wednesday, November 23, 2011

Eastbound and down

It's hard to believe that it's Thanksgiving, especially when you step outside and are greeted by sunshine and 60+ degree temperatures. But our calendars seldom lie, so it must mean that we're within hours of joining 40 million of our closest friends on the U.S. interstate highway system. Perhaps driving isn't the greenest choice to traverse the Midwest, but at least the multi-hundred mile journey will be in our compact little Saturn, which sips gasoline like a cute blue miser.


Now of course everyone wants to bring something along to Thanksgiving dinner, but that becomes a bit trickier when over the river and through the woods means the Mississippi River and the entire width of the state of Illinois. In years past we've made desserts, including an interesting pumpkin pie made with a local pumpkin and a slightly too-heavy pour of bourbon (Seriously, bourbon pumpkin pie is a real thing - we swear!). But this year has been a pretty poor one in the community garden space, and our backyard plot is clearly not up to production yet. So that means we're faced with buying something unique to our local area and bringing it along with us.

The question then becomes, what can we pick up that screams Iowa? Corn might be the obvious answer to the causal passerby, but its season has come and gone. We have some sweet potatoes still hanging around from the farmers market that we'll bring, but unless you're Greg, they're not a real showstopper. So I guess that leaves... Dutch chocolate.


Greg's Mom first discovered Chocolaterie Stam at their now-closed store in Pella, Iowa as a side trip when visiting him at Iowa State University. Since then it's been a tradition of sorts to bring along a winter assortment when traveling back to Chicago for the holidays. They're delicious and creamy-smooth, and they make such a fun addition to the Thanksgiving table when they've got festive harvest shapes like these.


It's not entirely clear on their website how a Dutch chocolate-making family decided to branch out and set up shop in central Iowa, but it's hard to argue with the wisdom of their choice as you're biting into a mushroom-shaped piece of dark chocolate raspberry ganache. Sure, we'd love to bake another pie (not a booze pie this time!), bring along a local heritage turkey, or grow our own beans for the green bean casserole. But once you reach the time of Thanksgiving day where you want to veg out on the couch and watch Home Alone, it's hard not to reach for a piece of Stam chocolate to munch on. It's local, and it's something we out-of-towners can provide.

What else is out there that's the true taste of Iowa, or of your hometown that you just have to bring along? Have a happy Thanksgiving, everyone!

Sunday, November 20, 2011

To Market, To Market...

Downtown Des Moines is no Chicago or New York, but it has its fair share of tall office buildings, all interconnected by a maze of skywalks. During the day on any given weekday, these corridors are awash with workers. On the weekends things settle down quite a bit, and you could likely walk the skywalks on a Saturday morning without seeing a soul. One notable exception took place this past Saturday, a day we'd been looking forward to for several weeks.


That's Capitol Square, a fairly typical office building in Des Moines, occupied Monday through Friday by lawyers, architects, business people. But on two Saturdays a year it transforms into a vibrant indoor Farmer's Market! Des Moines has one of the best Farmers Markets we've ever seen, and in-season it is one of our top sources for meat and produce that we don't grow ourselves. Fortunately for us, even after most of the harvesting is done, there are Winter Farmers Markets on the weekends before Thanksgiving and Christmas.


They absolutely fill the first two floors of Capitol Square with booths selling everything from handmade crafts and jellies to fall produce and meats. We're always thrilled to see our favorite farmers from the summer markets, especially after a few weeks off for our pantry to run down a bit. This time we were running a little late, so we didn't end up getting another butternut squash like we'd hoped. However, we were able to stock up on chicken from Foxhollow Farm, a great heritage breed poultry farm. Their meat has become our go-to for any chicken recipe, so we grabbed enough to last us for quite some time.


We feel so fortunate to have an event like this right here in our city, knowing from experience that not every locale can support a Farmers Market so late into the year. This gives us a way to continue enjoying fresh local food, and we're already looking forward to the next Winter Market in December. If you're reading from the Des Moines area, be sure to check it out on December 17th. You might be surprised what's still growing this winter. Maybe we'll even see you there!

Tuesday, November 15, 2011

Fall's First Harvest

You might think that late fall is a quiet time on the urban farm, but we seem to always be busy. In fact, the past few weeks have been prime harvesting time. But what are we harvesting? Didn't we already say that there was no food growing on our homestead when we bought it? Well, here's a bit of a clue. This picture of the house shows one section totally harvested.


Yep, that's right. It's a tree with all of its leaves already fallen. And where are said leaves? Certainly not on the lawn...


That's because LEAVES are our first harvest in our new home! Now don't worry, things haven't gotten so dire yet that we plan to eat them. Just like you can't eat a lawn, you can't really eat fallen leaves either. But I suppose after several steps through the food chain, these leaves will provide us some nourishment, albeit indirectly.

You see, leaves are a vital component of great compost. We told you earlier about the compost bin we built, but we still haven't done much to fill it. Lots of different kinds of organic matter can be composted, and we'll get into more detail on how that all breaks down in a future post. But leaves are a really handy source of carbon-rich compostable matter, and with all these trees, we had a great source of them.

The best way to compost leaves is to shred them first, but having bought our home in October, we haven't actually bought a lawn mower yet (and weren't quite ready to decide on one anyway). So we found a different tool.


That's Greg using our Toro Ultra Leaf Blower/Vac. This thing really sucks. Literally. And it shreds and packs the leaves into the attached bag. It's been a near-daily task the past month to spend at least a  little time working on vacuuming the leaves off the lawn, and as you saw in the first few pictures, we're pretty much done with the front yard. The back is still a work in progress, but it's not just busywork when you think of it as a harvest. Check out our bounty!


With any luck, these leaves will last us well into next year as we add them bit by bit into the compost bin. And if we do that right, eventually we'll have fantastic broken down material to add to the soil in our garden boxes. So, from that perspective, I guess we actually will be eating these leaves!

Wednesday, November 9, 2011

The Best Laid Plans

Of mice, men, and it turns out, locavores, oft times do go astray. Sigh...

It all started several weeks ago at the Des Moines Downtown Farmers Market. At the time it was mid-October, which meant wonderful fall vegetables were available. In the future we'll plan to grow many of these on our own "farm," but neglect and theivery had left us with none in our community gardening space. In the interim, we simply had to pick up some of each of our fall favorites: sweet potatoes for Greg and butternut squash for Stacia.

Now, the classic butternut squash dish is soup, but Greg really wanted to try something different, so we settled on a squash, sage and pine nut pasta recipe found online. It had been several days since we'd seriously cooked, so we were both excited.

We cut open our squash and scooped out the seeds. (Pretty, isn't it?)


Chopped it up with some onions (from our garden!), garlic (from the farmer's market) and sage (which we had been growing ourselves but lost to cold temperatures, so we got packaged stuff from a nearby herb farm). It looked like this, and the whole house smelled sage-y!


Into the oven it went to roast while we cooked the pasta and fried up some more sage. If you've never fried sage in olive oil, man that is a fragrant and tasty concoction.

Look how crispy they are!

Finally, we threw the squash mixture into a big pot with the pasta and the pine nuts to cook for a bit, then tossed with some shredded parmesan cheese and voila! - fancy dinner. Time to uncork a nice bottle and turn on the dinner jazz!


But wait... Isn't something missing? Nowhere in that whole list of steps was there mention of a sauce. And with starchy pasta, starchy squash and sticky parmesan cheese, that quickly became apparent. Great sage and squash flavor, to be sure, but it sure was hard to eat. And with this being our first really home-cooked meal in a while, it became even more disappointing.

But if there's one thing we've learned, it's that cooking is not an exact science, and adaptability is key. With a half-full pot of leftover squash pasta, simply giving up wasn't an option. We opted for the lazy route - buying a storebought alfredo jar, not wanting to spend a lot of time or effort if it wasn't salvageable. Fortunately Bertoli came to the rescue and, though the final product may not have been our favorite dish ever, at least we were able to polish off the leftovers the next day.

We can probably chalk this up to being a bit rusty in big-deal cooking lately. With all the moving and the yard work, most of our meals have been quick and easy, so we forgot the obvious steps of reading through the comments on the recipe (many others commented on how dry it was) and just critically thinking through the process. We should have recognized right off the bat that this pasta needed a sauce, but we stuck to the directions and needed to improvise at the last minute.

Fortunately there's another farmer's market in a few weeks, and hopefully someone will still have squash available. It would be sad for Stacia if this were her only butternut squash experience of the fall. Now we'll just need to decide what to make with the next one. Perfect this dish, make the traditional soup, or something else entirely? What's your go-to for squash?

Sunday, November 6, 2011

Tim-berrr!

Most of our backyard plans involve adding things to the backyard to create our little urban farm.  We'll be building, planting, raising, and growing all sorts of things.  But shortly after we moved in it had become clear that one aspect of the backyard was just going to be in our way; so a little destruction was in order.


Fruit trees are wonderful.  We've taken lots of trips to orchards where we could spend time amongst the trees and pick our own apples or cherries.  But these fruit trees were not so wonderful.  They were over-grown, unpruned, diseased, and hadn't borne fruit in many years.  The apple tree had a giant dead section devoid of any leaves, and the pear had so many suckers growing out of its base that it was hard to see the actual trunk. Though we wanted to find a way to save them, it was pretty clear that it wouldn't be feasible.

That opinion was echoed by the convenient horticulturist next door - our neighbor's nephew who stopped by to chat about our plans for the yard and diagnosed our trees as unsaveable. He then casually mentioned that he had a chainsaw and would be happy to cut down our problem trees. Naturally, we took him up on the offer.

Before this happened, we were actually toying with the idea of cutting these "small" trees down by ourselves.   Renting a saw, maybe watching some YouTube instructions, and winging it from there. We sure are glad that we didn't!  Trees look a lot smaller when they are standing in the air than they do when they come crashing to the ground.  We tried to look busy dragging branches around while our new friend with the chainsaw did most of the work.  He even tied a rope around each tree to guide its fall away from our fence and garlic bed.  So we can't really take much credit for this project, but that didn't stop Stacia from posing for this triumphant shot.


What you can't see in this photo is the decomposing interior of the tree trunk. Some portions of the tree were so decayed it was like dirt, inside the tree itself. That helped us feel better about cutting the trees down, showing us definitively how unwell they really were. So, with relatively clear consciences, we found ourselves with a humongous pile of brush and a stack of firewood we will be challenged to ever use up.  We hope to remain carbon-neutral by replacing these two with a couple of new trees next year, but that will be a project for another day!


Thursday, November 3, 2011

One Man's Trash...

The day that we moved our belongings out of our suburban condominium and into our new house, we were fortunate to have help from Stacia’s Mom.  She traveled down to Des Moines from the Minneapolis area and brought along a trailer to haul our bigger items across Des Moines.  We hauled all the furniture you'd figure we would have in a condo, plus a few other things that you might not expect.

Among the rest of our furniture, we loaded up a stack of four used shipping pallets.  These pallets had been collected from beside a dumpster, where they were likely bound for a landfill.  But we spotted them, and saw a new purpose in their future.  Stacia’s Mom didn’t even have to ask about the shipping pallets before we explained that they were to become our new compost bin.

Some parents might still be a bit confused after that explanation, but not ours. Both our families have had compost bins in their gardens since we were young, and they're definitely into the idea of creative recycling.  On top of that, Stacia's Mom is known for having plenty of “brilliantly crazy ideas” of her own.  If we had a plan to take something useless and create something of value, she was on board.

Just a few short days after our move-in we tackled the construction.  It was a pretty simple project, perfect for our level of woodworking skill.  We took our four shipping pallets (all approximately the same size), then added four L-shaped brackets, two hinges, a gate latch, and a caster.  We placed three of the pallets in a U-shape and used the brackets to hold them together.  The fourth pallet would serve as our gate, so we raised that a few inches off the ground to prevent it from dragging and attached it to one side of the U with our hinges.  We added the gate latch to the other side so that we could close it up.  The bin wasn’t quite rigid enough to hold the gate up, so we added a caster under the end of the pallet with the latch to stop it from sagging.  And here’s what we had created:


It had everything we needed in a compost bin.  It allowed us to contain a pile of decomposing material, provided needed air flow between the slats, and gave us an easy access through the "gate" to allow us to turn the pile.  We had just one problem; it was pretty ugly.  Go figure that a bunch of old shipping pallets don't exactly look like they came out of Better Homes and Gardens. So in an attempt to keep it from looking like something we snatched from a dumpster, we added a coat of paint.  And we were finished!


The color is just a bit more tropical pastel than we were expecting, but it lends a little brightness to the garden anyway. Now we’ll just fill it up with organic stuff and if all goes well, we’ll have rich compost to use in our garden next year.  It seems fitting to be turning what's essentially trash into a really useful material inside a bin that itself was saved from the landfill. We’ll keep you posted to see how it goes!

Sunday, October 30, 2011

A Spook-tacular Time to Garden

The leaves are starting to fall, there’s a chill in the air and pumpkins are showing up on doorsteps everywhere. That can mean only one thing: vampires! Sorry, got a little sidetracked there. What it actually means is it’s time for gardening!

I know what you’re thinking. Gardening in the fall? Isn’t it the wrong time of year for that? If we were starting tomatoes or peppers, that would be absolutely correct. But this is just the right time to start on one crop.


It’s garlic! Gosh, we love garlic. It goes into most any recipe you might be cooking, tastes great as garlic toast, and is believed to aid in digestion (and repel vampires). There’s almost nothing we make that isn’t made better by the flavorful kick of garlic. And if you grow your own, you can fine-tune that kick to just the way you like it.

You see, there are far more varieties of garlic than what you find at your local grocery store. We’ve been fortunate that Greg’s Dad has experimented with many different varieties of garlic (providing us with wonderful samples), so we’ve been able to home in on one that we really enjoy – Georgian Crystal. It’s got some fire to it but not too much, and it breaks into really good-sized cloves.


This is a hardneck variety, so named because of a long stalk which it sends out in the spring. The alternative is softneck, which you’ve probably seen in the grocery store. There are pros and cons to each type, which are detailed nicely on this cool publication from Iowa State University Extension. For us, we know a hardneck will do well in Iowa and we love the flavor of Georgian Crystal, so we’ll use that for our first go-round. We bought ours online from wegrowgarlic.com, a Wisconsin garlic farm.

Starting garlic is pretty easy, since most of the first part of its life is over the winter. After you break each bulb into cloves, plant the cloves pointed end up about an inch deep in loose, well-draining soil. Typical recommendations are to space them about 3 to 5 inches apart from one another. Then you cover the entire garlic bed with an insulating material, like straw or shredded leaves. Cover them with four to six loose inches, and then you can pretty much leave them alone until spring! Here’s what our garlic box looked like just after planting.


This is our first time planting garlic, so hopefully it all goes according to plan and by this time next year we’ll be enjoying homegrown garlic from our own backyard. And if we’re able to keep those pesky vampires away, well that’s just a bonus.

Monday, October 24, 2011

Before We Go Too Far...

One of the biggest challenges since moving to our new house (aside from finagling our massive couch down three flights of stairs) was to make a point to take a few pictures before we dove right in to making changes. That's not to say that we didn't start a garden project on our first day, but we at least made sure to document our "before" pictures along the way.

We chose our home in part because it has an immense lot for being within the Des Moines city limits, but it's kind of strangely proportioned. At a full 300 ft long by 60 ft wide, we have a pretty high aspect ratio. That works, because of where the different features sit. Close to the house are several great big shade trees that, aside from a possible future trim, will stay mostly the same. There's no way traditional garden crops would grow in this area, so we'll have to work in some non-garden plans for this part of the yard.


Beyond the older trees is where most of the action will happen, at the back of the yard. We've already mentioned the two fruit trees (we've since learned that one is an apple and the other a pear). These trees have not been well taken care of, and have some serious signs of distress. It seems they may not be salvageable, and our neighbors have noted that they've not borne fruit in nearly ten years. It seems these two will have to be removed, but we plan to replace them with other fruit-bearing trees.

The primary gardening space is currently being occupied by a ragtag wooden playset surrounded by a carpet of wood chips and weeds. I don't think either of us or our two cats plan to play on this, plus there's a city park literally a block away, so it looks as if the playset is also going to go away. The goal is to slowly but surely replace the entire area with raised gardening beds, filled with different varieties of vegetables and fruits. We've had some success with raised beds in our limited gardening experience so far, so it seems like a good idea to stick with it. With just a few exceptions, these boxes will all be the same size so we can actually rotate crops!


Obviously it will take some time and a lot of labor before the visions in our heads and the reality out our back window actually mesh up, but hopefully we'll be able to look back at these pictures one day and hardly recognize the place. I think we'll be amazed by how far we'll have come.

Wednesday, October 19, 2011

Hello and Welcome!


Does the world really need another blog?  Maybe not, but here we are anyway!  We are Greg and Stacia, a couple of urban farmers setting out on a mission to produce much of our food right in our own backyard.  We've recently purchased a home in the beautiful Midwestern city of Des Moines, Iowa.  The large backyard is a big expanse of shade trees and grass.  The lot is a little less than half an acre, and right now it doesn't produce an ounce of food.  There are two apple trees in the yard, but they've been so neglected that they can't really do much for fruit production.

We are beginning this blog in an effort to document our adventures in urban farming.  We've done a little bit of gardening, but much of this endeavor is likely to be a combination of internet research and good old fashioned trial and error.  We hope you enjoy reading about our crazy projects, our successes, and (hopefully few) failures.  Who knows, you may even be inspired to produce some food of your own!