Sunday, February 26, 2012

First Seeds of the Season

You hear so much about how kids don't like to eat vegetables, but neither of us ever fit that stereotype. That was probably in large part due to being around a garden and actively helping in the kitchen to see where our food actually came from. But it also can come from the mindset you have about food. When Greg was a little boy, one of his favorite veggies was broccoli, and he still loves it to this day. As a kid, he would pretend the broccoli were tiny trees, and he was a giant dinosaur, chomping the tops off them. We can't promise that he doesn't still do that.

Naturally, this means we're going to plant some broccoli in our garden this year, and this weekend marked the start of the process. Broccoli is a cool-season crop, and if it gets too warm it starts to bolt, or grow flowers. We've had some trouble with this in previous years. So basically what you want is to have a healthy seedling that you can put outside early in the spring. To do that, you need to plant the seeds indoors around this time of year.


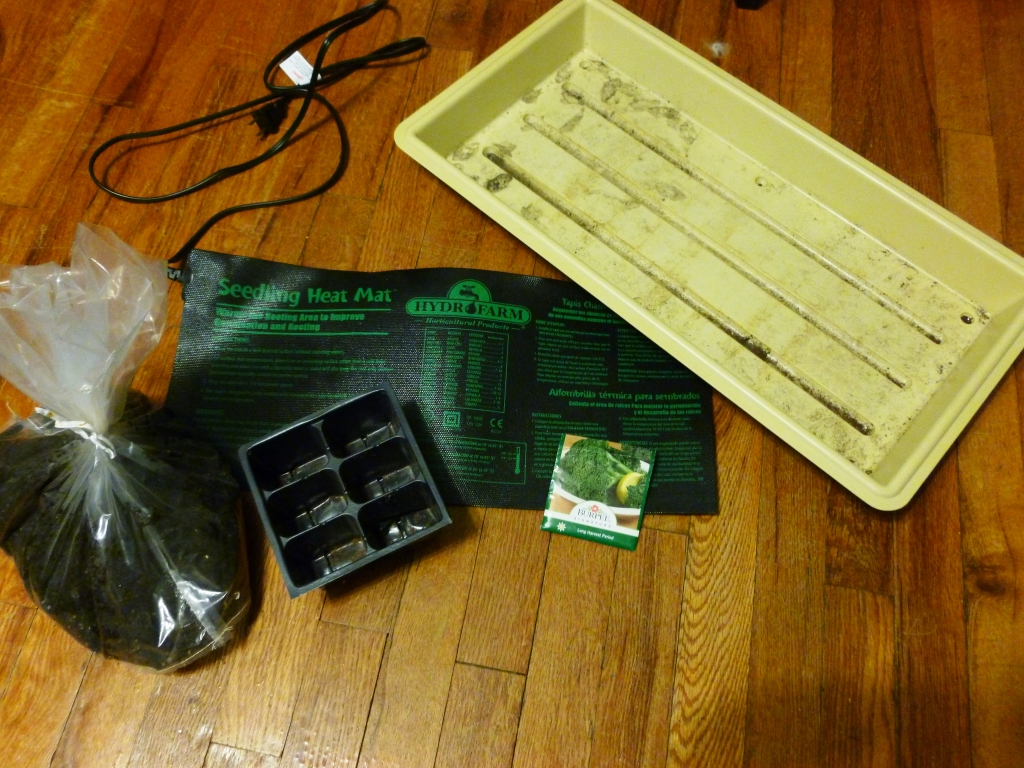
Here's everything we used to get our broccoli started. We have some potting soil, a heat mat, a seed tray, some of those six-pack seed container thingys, and of course, the broccoli seeds. Potting soil is a bit of a misnomer, since it's actually soil-less. Storebought stuff is a mix of mostly peat and vermiculite, or you can make your own using those same ingredients. Ours uses coconut coir in place of the peat, since it's more environmentally friendly and sustainable. Either will work, but don't use actual soil, because it contains micro-organisms that can break down the seeds before they germinate.


Broccoli seeds are tiny! That's a handful of our Burpee Green Goliath seeds that we've been trying to grow for the past few years. We've never had a great harvest so we can't vouch for how tasty this particular variety is, but we're game to give it another shot this year.

Planting the seeds is super easy. We just filled our six packs with potting soil, made a small (1/4 inch, per the packet) indentation, and dropped in one seed per pod. Here you can just barely see the reddish brown broccoli seeds nestled into our little divots.


We topped each seed with a little soil and gave them a good drink of water. The seeds need water to germinate, so we'll be keeping an eye on them and adding water as needed. We set the six-packs into the tray, and set the tray onto the heat mat. We're using a heat mat because broccoli's ideal germination temperature is 80 degrees. Don't worry if you don't have a heat mat, because broccoli can germinate in soils as cool as 40 degrees. Finally we put a plastic cover on the top to retain warmth and moisture.


Burpee thinks these will take up to ten days to sprout, but last year we saw seedlings as early as two days after planting. Once that happens, we'll switch off the heat and focus on providing light. Then in another four to six weeks, we'll hopefully have sturdy little broccoli plants that can handle going outside or at least into our cold frame. And then, if all goes well, it's only a matter of time until we can harvest our tiny trees. CHOMP!

Sunday, February 19, 2012

Warming Up With a Cold Frame

For this being a blog about farming, we haven't actually done much farming yet on our urban homestead. Part of that is just the unfortunate timing of finding our dream house/lot at the end of fall. We hurried to put in a garlic bed, but since then we've just been waiting and planning. Well, this "false spring" weather we've been having finally kicked our butts into action. So this weekend we built our first cold frame.

Folk wisdom in Iowa holds that you plant your cold-hardy crops a few weeks before the last frost, typically sometime in April. That felt like way too long to wait, but luckily there are ways to extend the growing season. We already knew about some of the more complicated ones, like greenhouses and high tunnels, but only recently discovered how easily we could build a similar structure for our raised beds.

A cold frame works on the same principles as a greenhouse; it shelters the plants and uses clear panels to let in sunlight and trap heat. In this sense it truly is solar powered - you don't need to add any external heat source to see a double-digit temperature increase inside the box. Combined with our recently obtained $5 windowpanes from the ReStore, this project was just too tempting to resist!

We started by building a wooden box. We've already done this several times with our raised garden beds. But this one needed to have a slight angle to it. Cold frames are designed to face South to capture as much sunlight as possible, so the Southerly side is about 4 inches shorter than the North. We cut the front and back to length, then made a long diagonal cut along the sides to taper from 4 to 8 inches in height. Since our three windows wouldn't cover our desired 4x8 raised bed, we also cut a few boards to fill in the empty spaces. All laid out, it looked like this:


We used a few screws in each corner to build our perimeter. As-is, the angle of the sides doesn't match up with the vertical boards of the front and back very well, so our windows wouldn't have a good snug fit. The best way to have the windows sit flush is to build the perimeter on a flat surface as we did here, then flip it over so the angles match perfectly. For more on this, and on cold frames in general, check out the very informative Four-Season Harvest by Eliot Coleman. We followed his plans almost exactly here, and are thrilled with our results.


The spacers we used aren't structural, so we just tacked them in with a few nails at each end. We needed them because we built the cold frame to match our "standard" raised bed size, even though we didn't have eight feet of windows. We had enough glass to cover most of the cold frame, so we knew the wooden spacers wouldn't have too much of a shading effect. As the sun travels across the sky, these small shadows will be cast on different parts of the bed, so there should be plenty of light for all the plants.


From here it was simple to place the cold frame on top of one of our garden beds, and insert the windowpanes. The cold frame isn't attached to the bed, so we'll be able to move it around the garden to whichever area needs extra heat. Early on, that means we can start spinach and radishes a few weeks ahead of schedule. Once they're established, we can move the frame to get a jump start on tomatoes and peppers. Then in the fall, we can repeat with greens or move on to root vegetables. It should be useful virtually the whole season long!


We put in the cold frame this afternoon, and a few short hours later it was already 15 degrees warmer inside the frame than it was outside. Our particular cold frame might need a few tweaks to really amp that up. At the moment it overhangs the front and back of the garden bed, just because of the height of the windows. That's a route for warm air to escape, so we'll probably try to add some boards to close the gaps. The cold frame should make a big difference in our garden, and it only took us about a day to build. Now if we can find more inexpensive windows, we might just need to build a few more of these!

Wednesday, February 8, 2012

Reuse, Recycle, ReStore

We moved into our new house about 4 months ago, and little by little we're figuring out just where everything will go and how we'll use each room.  But one area of the house currently has a purpose that is still entirely temporary. For the past several weeks, the basement has been a chicken coop construction zone, complete with sawdust, power tools, and stacks of repurposed lumber.

Neither of us can claim to have much experience with carpentry, but as we are constantly telling ourselves, "I don't think the chickens will care." So maybe each wall won't be perfectly straight because some of the old playset boards are a little warped or cracked, but they can still be useful. And just because we didn't want a backyard playset, doesn't mean that all of the boards are ready for the landfill.

With that in mind, we decided to check out the Greater Des Moines Habitat for Humanity's ReStore a couple of weeks ago.  The ReStore is stocked with a random collection of building materials that have been donated to Habitat for Humanity. When they recieve these donations, they first try to put them to use in the homes that they build. But sometimes they get donations that aren't quite what they need, and those items end up at the ReStore. The ReStore sells to the public, and uses the money to help support Habitat for Humanity's efforts to provide homes to people in need. There are ReStore outlets located in many major cities throughout the United States and Canada.


Walking into the ReStore is like entering a hardware store crossed with a flea market. Everything's organized, but since the donations are so random, inventory totally varies over time. One week there might be pallets full of ceramic tiles and landscaping blocks; another visit might yield a glut of bathtubs. It's a bit of an adventure to see what might be in stock on any given day. Some of the items at the ReStore are salvaged from a previous home, and just waiting for someone to find a new purpose for them. But they also have lots of new materials, so if you have a project at your home, it's worth stopping by to browse around.  You never know what you might find.

We're trying to build the chicken coop inexpensively, and as we mentioned while building our compost bin, we like to find the worth in "worthless" things. We spent quite a bit of time strolling up and down the aisles, back and forth across the store. We didn't know exactly what we hoped to find, but a couple of interesting items made their way home with us.


When Stacia drew pictures of the chicken coop, she included a crossbuck style door, just to add a little country charm to the design. She wasn't really thinking that concept would come to life exactly as drawn, but as fate would have it, we stumbled upon the perfect door hiding in a stack of perfectly ordinary doors. It's not the prettiest color, but it's structurally solid, and cost us just twenty-five dollars.  With a fresh coat of paint it'll grace the front of our coop quite nicely.

And while we initially wanted to find windows for the coop, we happened upon three like the one pictured that will have a rather different destination. Coop windows need to slide open for ventilation, but once we saw the big, plain wood-framed windows with no screens, we knew they had to go into our cold frame. We'll certainly talk more about cold frames as we work on building ours, but in short they're mini-greenhouses used to extend the growing season. These simple panes are perfect for a cold frame, and they were only five bucks a pop.

We didn't find quite the right windows for the chicken coop that day, but with new donations coming in all the time, we'll be sure to stop by again. Maybe another time we'll find just the right windows to complete our chicken coop project.  Or maybe we'll stumble upon the raw materials (and inspiration) to build something else entirely. Whatever building supplies you might be looking for, a trip to the ReStore is a treasure hunt that's definitely worth checking out.

Wednesday, February 1, 2012

A Victory Garden

The stalwart housewives, the inspiring calls to duty, and the bright splash of green amidst all the red, white, and blue.  Patriotism can take a lot of forms, but one that has always captivated this pair of urban farmers is the Victory Garden poster. Since we're only in our late twenties, we've never actually experienced life at a time when these posters were commonplace; in fact we've only ever seen them in museums.  But their messages are timeless, and have played a major part in inspiring us to take this journey into producing food in our own backyard.


In case you aren’t familiar with them, Victory Gardens were a concept that sprung up during World War I and again during World War II.  With the country’s resources stretched thin while fighting overseas, the US government encouraged families on the home front to grow vegetables, preserve fruit, and raise hens to supplement their food rations.  Victory Garden posters told everyone in America that every ounce of food they produced helped their country win the wars in which their loved ones were fighting.  It had to be a very difficult and frightening time, but this movement allowed everyone to feel empowered to do their part.


Nearly seventy years later, our country still has soldiers fighting abroad, but thankfully food shortages and rationing are a thing of the past.  However, our current agricultural system has its own flaws that do potentially put our nation at risk. Food today is heavily processed, and shipped from far-flung places, which increases reliance on finite reserves of fossil fuels.  Plus there are the millions of Americans who live in "food deserts," places where they don’t have access to fresh, healthy, affordable food.  With so many left no option but to eat junk food, incidence of obesity and diseases like diabetes are on the rise. We don’t claim to have all of the answers, but it doesn’t seem like we are solving anything by putting our efforts into growing green, well-manicured stretches of Kentucky Bluegrass.  (We’ll avoid shamefully dropping the blog name here.)


You don’t have to dive right in and plant a 400 square-foot garden like we plan to.  Maybe you start with just a couple of rows of your favorite vegetable or a planter box on your patio.  And maybe you don’t know what you’re doing and wind up not getting anything out of it.  Trust us; we’ve had our fair share of miserable failures.  But we’ve always learned from our mistakes, and given it another try.  We’ve tried raising homegrown broccoli for the past three years and haven’t eaten an ounce of it yet.  But each year we’ve gotten a little closer, and maybe this year will be the one.  We can almost taste it.