Friday, June 29, 2012

Urban Farm Fresh Herbs

We've talked about our garden quite a bit on these pages, but there is still one garden we haven't made much mention of, and it's nearly as important as the main one: our herb garden. If you've ever bought fresh herbs at the grocery store, you can probably see how a few seed packets or started plants can save you lots of money in the long run. Every time we opened one of those $2-3 plastic packages of basil or cilantro, we've vowed that our new garden would have a dedicated space for herbs. And now we have one!


We planted ours in one of our now-standard raised beds, but kept this one to 4x4 square as opposed to our usual 4x8 shape. In this space, we have some of virtually all the herbs we most frequently use in our cooking. Chives, cilantro, oregano, parsley, sage, basil, and rosemary, plus a new one for us - Thai holy basil. Many of these we grew from seeds, but some of the others were slow to germinate so we bought started plants.


Rosemary in particular is a good one to buy at a garden store. Unlike most other herbs, rosemary is actually a perrenial, meaning it can come back year after year. In our climate the winters are too harsh to allow this, so you either have to start over each year, or bring the plant inside in a container until it warms up again. Which brings up another great point about herbs - they are fantastic for container gardening! You don't need to have a big garden like we have to grow these plants; a planter placed on a sunny balcony can do just as well. This makes herbs a fun way to ease into trying to grow some of your own edibles.


As you can see in these pictures, Stacia had some fun labeling our herbs. All it took was a few nice flat rocks, some white paint, and spray-on laquer to seal the surface. Working in the construction industry, Stacia sees a lot of rocks, so it was easy for her to scoop up a few interesting-looking ones for a little craft project. Not that we need much help identifying that giant bunch of lovely aromatic basil, but it just makes things look pretty. And functional though our garden may be, we still want it to look nice.

And, the herb garden is just as great in practice as it is in theory. The other night, we made some quick spaghetti with a homemade sauce. We did the sauce "stone soup" style, simply throwing in a little of every vegetable we had that we thought sounded good. As it simmered, we were able to step outside to the herb garden and snip a few herbs that we thought would go well with it.


We harvested a few sprigs of oregano and a good-sized bunch of basil, then chopped them up finely and added them to our simmering sauce. Immediately you could smell the difference, and soon the distinctly Italian aroma of these two herbs wound its way through the house. We had planned to let this sauce simmer for at least 40 minutes, but before long it smelled just too good to wait any longer and we had to eat.


Nothing particularly novel here - just a bowl of spaghetti noodles topped with a tomato and vegetable sauce, but the ability to add our own fresh-picked herbs really made things noticeably tastier. If you've got a garden, you just have to grow your own herbs. If you don't have a garden yet, herbs are a great place to start!

Wednesday, June 20, 2012

Our Adventures Rendering Lard

When we ordered our half hog last winter, the final question on the order form asked us to circle the, what you might call, leftover parts that we wanted to keep. Things like liver and heart, which we still have no idea how to use, and lard, which we knew would be very useful. Our share of the hog included 11 pounds of lard, and just recently we decided to do something about it.


That's half of the lard, as it arrived from the locker. It doesn't come in the most attractive package. But then again, we're talking about 5 pounds of frozen ground pork fat, which is kinda hard to dress up. In this state, lard can't really be used for much. It has to be rendered, or cooked down, to get a product that can go into pastries or cooking. We began by opening the package and chopping the frozen chunk into smaller pieces so they'd melt quicker.


We placed the pieces into our stock pot, and set it on the stove on a low heat setting.  It is important to melt the fat slowly without scalding it, otherwise the lard will have a yellowish-brown color and will smell rather "piggy."


After a few hours, the fat had completely melted.  There are lots of little solid bits suspended in the melted fat.  These are commonly referred to as "cracklins," which are basically connective tissue that was in the pig's fat. You can keep these after you're done rendering lard, and fry them up to eat. We tried that with a small portion of our cracklins but didn't really enjoy them enough to do the rest. It must be an acquired taste...


To get the lard which we did want to keep, we needed to filter out the cracklins.  We used two colanders stacked together with a layer of cheesecloth between them.  The cheesecloth allowed us get rid of even the smallest solid bits and using two colanders helped keep the colanders from getting clogged up.


The five pounds of lard that we started with ended up rendering down to about 1 1/2 quarts, which we divided up into two quart-size canning jars. Right out of the stockpot, it was a slightly yellow liquid, which made it easy to pour. Unfortunately, it didn't look terribly appealing straight away. Thankfully that went away as it cooled, and we were left with...


Snow-white, fluffy lard. It has solidified somewhat from its earlier liquid state, but it's still recommended that you store it in the freezer or the fridge so it's easier to scoop and measure it. This is the state in which you can use it in baking or cooking, typically in a place where a recipe would call for shortening.

Which, of course, we just had to try! We had over a quart of brand new lard, and we wanted to make a pie crust with it. Now, as a warning, this lard does retain a little bit of its pork flavor, so you'd probably want to stick to savory pies. Leaf lard, the fat from around the hog's organs, is supposed to be virtually flavorless, so you could use it for a dessert pie, though we haven't gotten around to that just yet.


We followed a recipe from one of our cookbooks (The Good Cook) for a lard-based pie crust. Stacia rolled out a perfect-sized crust, which we then prebaked. This one was going to be used for a quiche, so we filled it with a mixture of scrambled eggs, bacon from the same hog, and a lot of spinach from our garden.


It was so beautiful when it came out of the oven! Thankfully it was just as delicious as it looked. The pastry crust came out light and incredibly flaky, with maybe just a hint of savory pork flavor. A suggestion we found that we definitely want to try next time is to make the crust with half lard and half butter. This yields a best-of-both-worlds result, with the amazing flakiness of the lard, but with the added flavor of butter. That's for next time; for this time we were satisfied enjoying our first of many homemade quiches!


Rendering lard probably isn't for everybody, but it's not really that hard to do. Of course, it starts with having a source of unrendered fat, which you pretty much only end up with if you buy a half hog. But the cooking process was relatively painless, although it did take several hours. There did end up being a little bit of a pork-y aroma in the kitchen, but it wasn't too potent. And we can take a little bit of that if it means we get to eat fantastic quiches and pies! We're certainly glad we checked "yes" on the lard part of our hog order form.

We'd like to thank our farmer for all of the help we got from this great tutorial on rendering lard!

This post has been shared with Simple Lives Thursday.

Sunday, June 10, 2012

A Visit to the Berry Patch

It's June in Iowa, and that means one thing: it's strawberry season! You might remember we planted our own strawberry plants earlier this spring, but they likely won't produce any fruit at all in their first year. But we didn't let that deter us from taking advantage of the season so we did the next best thing.


A local pick-your-own berry farm! Berry Patch Farm is another producer that we first met at the downtown Des Moines Farmers Market, and we liked their produce so much that we decided to drive the 45 minutes to their farm north of Des Moines. It was going to reach 90 degrees by the afternoon, so we got out there right when they opened at 8 AM. Apparently we weren't the only people with that idea...


The friendly farmers directed us to a strawberry field that was ripe this weekend, and gave each of us a row to start picking. They also provided containers, ranging from individual pints up to 10 pound flats. As you might imagine, we opted for the latter.

Now, you can't really see any strawberry plants in that picture of the field. That's because strawberries grow very low to the ground, and some opportunistic weeds are towering above them. To get to the berries, you have to bend, stoop, or outright crawl along the rows. It's also a good idea to wear long pants, and maybe even long sleeves. Even though it's hot, wading through the weeds can be irritating to your skin. But it's worth it when you find a clump of strawberries that looks like this:


These locally grown strawberries are almost nothing like the ones you buy at the grocery store. The skin is ruby red, and the flesh is velvety soft and sweet. The berries were so sweet that the whole field gave off a sugary aroma. We picked a few, then tried a small sample, and then really started picking to get as many of these luscious berries as we could.


We spent about an hour in the field, and these were the (literal) fruits of our labor. We pretty well filled the flats, ending up with 18 pounds of red ripe strawberries. After that work, we were ready to head home and enjoy our harvest. Now, we're always up for a challenge, but 9 pounds apiece is a bit much for even us to eat fresh. But one of the key parts to getting produce in season is finding a way to store it to enjoy year-round.

Strawberries can be made into jams or jellies which would be put up in cans for later. We've done that before, but this time we decided we'd rather freeze them whole. We've lately been enjoying homemade smoothies with other frozen fruits, and these delicious strawberries seem like a good fit for that too. Otherwise, frozen berries can still be used for pies, sauces and many other things.


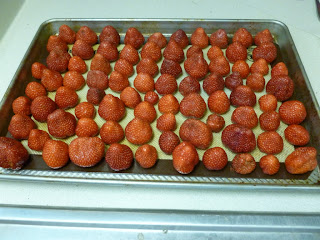
Freezing strawberries is pretty simple. We cut out the hulls (the top center part of the berry where the stem is attached), rinsed the berries under cool water and patted them dry. Then we stood them all up on a lined cookie sheet without letting any of the berries touch. We put that into our chest freezer for 3-4 hours to get them partially frozen.


We then tossed the berries into ziploc bags for long-term storage. We needed that initial freeze to keep the berries from sticking together in the bags; this way we should be able to pull out a handful at a time to make our smoothies. We'll freeze a little more than half of our haul, and find lots of ways to eat the fresh ones over the next few days. Until we have our own plants, there really is no better way to get fresh produce than going to a pick-your-own farm, and Berry Patch sure is a nice one!

This post has been shared with Simple Lives Thursday.

Friday, June 1, 2012

May Harvest Update

As we were scurrying about this morning getting ready to leave for our day jobs (not farming), Greg glanced out the back window and was greeted with this view. Our garden always seems bucolic and peaceful, but on this crisp morning it just looked so nice we had to stop out and visit for a few minutes.


Most of the plants - those that haven't been attacked too badly by our neighborhood rabbits - looked very good. Our broccoli is starting to form heads, which is a really encouraging sign. Two years running we've lost our entire broccoli crop either to bolting or to animals, so we're excited about any possible harvest. We haven't gotten any yet, but we're hopeful.


The one area where we have been harvesting quite a bit is our greens and radish box. This box was planted with 1/3 spinach, 1/3 radishes, and 1/3 various lettuces. By now all the radishes have been pulled, but the others are still going strong. From the start of the season up to the end of May, we've harvested:

 - 70 radishes, each about 0.6 ounces, for a total of 2 lb 10 ounces
 - As many radish greens as we cared to eat; the rest went to compost
 - 5 ounces of garlic scapes, the flavorful shoots that appear in the spring
 - 1 lb, 10 ounces of baby leaf spinach
 - No significant lettuce or mache


Now, you can see there is plentiful lettuce growing here, but we've chosen so far not to harvest it. Based on a few nibbles here and there, we've discovered that our leaf lettuces are incredibly bitter! Some quick internet research seems to indicate that it's either soil nutrient deficiencies or inconsistent watering, but we're just not sure yet. Any experience our readers have in growing lettuce that isn't spit-it-out bitter would be greatly appreciated.

Oh, and our chickens haven't produced a thing for us yet, but they are still really cute and fun to play with. They love to eat the plentiful clover that grows in our yard, and they trust us now enough to eat it right out of our hands.


All told it's not a ton of food just yet, but we can see that a lot of plants are getting close to harvest stage. The broccoli we mentioned, as well as kale and snap peas, should be ripe within a week or two. Plus we've been eating spinach and radishes in almost every home-cooked meal this month, from salads and sandwiches to spinach pizzas and oven-roasted radishes. They taste great, we know they've been naturally grown, and we eat them fresh-picked straight from the earth.

How's your garden looking so far this year? Hopefully it's been a bountiful harvest all around and it continues into the rest of the gardening season.