Showing posts with label preserving. Show all posts

Sunday, June 23, 2013

Homegrown/Homemade Strawberry Jam

It's been a long time since we've posted, so a lot has been happening around the garden. Everything is in the ground by now, and we're starting some harvesting while the rest of the plants just focus on growing. For the most part, we've planted the same things as we did last year, but there have been a few changes, especially with the perennials. One of the most exciting of these is that our strawberries, in their second year, are producing fruit!

Last year we planted 25 tiny strawberry plants in one of our garden boxes, which produced a handful of small berries. By now, they're another year older, and they've had a good rainy spring instead of last year's drought. As a result, the plants have really, well, perked up.


These are Tribute plants, an everbearing strawberry. That means they first ripen in the late spring or early summer, then continue to ripen in six week intervals throughout the summer. So far, it's been a wonderful harvest. Every few days we head outside and pick a bowlful (or more) of fresh sweet strawberries. We eat many of these right off the plant, but it's also nice to be able to save some to enjoy later. So when we picked about a gallon of ripe berries yesterday morning, we just had to do something with them. Here they are, one morning's harvest.


As you can see, we've chopped the berries into quarters, in preparation of making one of the our favorite strawberry items: fresh strawberry jam. Really, this is a simple thing to make, and it's a great way to experience the delicious flavor of these berries months after the harvest is over. The only other things you need are sugar, fruit pectin, and some canning jars. First, you mash up the berries a little to soften them up for the jam.

Then you bring the berries up to a boil, along with the pectin, mixed into about 1/4 cup of the sugar. Pectin is a totally natural product; it's the substance in plants that holds the cell walls together. It's extracted from fruit, and is readily available in grocery and hardware stores, near the canning supplies. As you might imagine, a substance that binds plants together is useful for setting up the gel that you expect in a jelly or jam. Some fruits have plenty of pectin within them, but strawberries are a little light so you have to add the packaged stuff. Here it is, coming up to a boil.


Once this has boiled, you stir in another 3 3/4 cups of sugar, return it to a boil, and boil for one full minute. At this point, there are ways to test for gel, but in our case it was quite noticeable while stirring that the jam was thickening. From here, the jam is simply ladled into clean warm canning jars, placed into a water batch canner, and processed for 10 minutes. That's it!


Once the jars have been pulled out and cooled, they're ready to enjoy whenever you want. For us, we have plenty of fresh strawberries to eat first before we want to crack one of these open, so we'll plan to store them for a little while before we dip into them. That's really no problem; in the sealed jars, the jam should stay fresh for at least a year and probably more. Of course, we did do a thorough job scraping our jam pot clean and tasting the little bit that didn't make it into the jars. It was delicious! In some ways, we can't wait til we get to open one of the finished jars.


This was such a fun project for us. We've canned fruit and jam several times before, often with purchased fruit, sometimes with fruit we picked ourselves, and once with fruit from Greg's Dad's trees. But this batch of strawberry jam marks the first time we've grown the fruit ourselves, picked it ourselves, and processed it into jam. This is homegrown, homemade, and home-canned. Having that kind of connection to our food is only going to make it taste that much better!

One final note, which we would be remiss in not mentioning. We frequently consult the Ball Blue Book for recipes and instruction on how to can, but our real reference guide is the website www.pickyourown.org. This site is an amazing one stop shop for finding pick-your-own farms and tons of canning recipes for how to preserve what you pick. If you have any interest in canning, we definitely recommend this site.

The first jam of 2013 is in the books. We'll see how many more we end up making before the growing season is over. Once you start canning, you just want to keep going!

Monday, April 22, 2013

Thoughts on Earth Day

Today is Earth Day, which is a good reminder to think about how all that we do affects the environment. Many of our projects at You Can’t Eat a Lawn are inspired by a desire to better serve the planet, along with the benefits to our health and pocketbooks. Eco-consciousness is always in the back of our minds, but today is a good annual poke to consider ways that we can do more. For example, it is our goal this year to add rain barrels to our homestead to conserve more water. But before that little project begins, here’s a look at some things we’ve already done with some success that anyone can implement to help the planet.


Compost – Earth Day always features a lot of talk about recycling, but composting is an often-overlooked companion to also reduce our amount of trash generation. Think about what you throw away and how much of it is organic material, or kitchen scraps. Simply piling that material in a bin with air, water and warmth allows it to break down into wonderful nutrients for plants without taking up space in a landfill. This is a double win since it saves you money on buying fertilizers. Even if you don’t have space for an outdoor compost pile, you can compost indoors with a worm bin.

Plant a garden – Walking through the produce section at the grocery store is like taking a virtual world tour. Tomatoes from Mexico or Canada, asparagus from Chile, oranges from Australia. Each one of those items was trucked, shipped or flown to your store, meaning significant carbon emissions into our atmosphere. And because it takes so long to travel that distance, most of this food is picked early and underripe. That’s why a store tomato cannot compare to the flavor of a fresh garden tomato. If you’re a novice, start small. How about a window box or small planter? Maybe start with herbs or greens before graduating to big items like tomatoes and peppers. And don’t worry about failure. We’ve lost more crops than we can count, but we keep plugging away.


Buy a share of an animal – We’ve said it before but it bears repeating that it’s impossible to raise pork chops. The tidy slices of meat you find at the grocery meat counter were once part of a full animal, including the less popular parts. For every chop, there is a pork hock, for every chicken breast, there is a hindquarter. When we buy only the mass-marketed pieces, that means the other portions are wasted. But there’s a silver lining – some of those less desirable parts are the most flavorful. You can’t make a decent split-pea soup without a pork hock, and chicken leg quarters have much tastier meat than the breasts. Factor in that you’re supporting a local farmer, and it makes a half hog or beef even better.

Learn to preserve – Canning is largely a fading art, although it seems to be making a bit of a resurgence. And it’s great for the planet, too. Suppose you get a bumper crop of a certain fruit/vegetable, and you’re absolutely inundated, as we’ve found ourselves to be on more than one occasion. You can try to incorporate that item into every meal, but even that might not keep up with your harvest. Learning to put that food up, either by canning or freezing, keeps you from wasting food. And later on, after the growing season, that preserved food can keep you from needing to buy grocery store produce from far-flung locations.


We could certainly go on with other ideas that can help you celebrate Earth Day and become more self-sufficient, but we don’t want to prattle on for too long. Harvesting rainwater helps protect our waterways and groundwater; incorporating shredded leaves into the garden loosens the soil while preserving our peat bogs; planting trees helps capture carbon dioxide, and if they’re fruit trees, they feed you too. The list goes on and on.

But as we reflect on Earth Day, perhaps the most powerful tool we can think of is to spread the word about what we, and you our readers, are doing. Surely each of us knows a person who says gardening is too hard, takes too much time, or isn’t worth it. Sharing our stories with these individuals, and the world at large, hopefully might lead to a small change. From shopping at a grocery store to a farmer’s market. Tearing up a small patch of grass to grow food. The more small steps like these that we all can encourage, the more of a change we truly can make for Earth Day, and for every day.

Friday, August 17, 2012

When Life Gives You Cucumbers...

Way back when we were buying seeds, we bought (or already had on hand) seeds for cantaloupe, butternut squash and cucumbers. The plan was to find a place in the lawn to dig out the sod and put in a vine patch. But with all the other work that we were doing on our raised beds, we simply never found the time to set this space up. Eventually we mounded up three hills in the very back section of the lot and planted seeds for those three plants, thinking at least giving them a try was better than not having it perfect. It seemed like a good plan.

Which it was, in theory. The trouble was that reality didn't agree much. The back of the yard was the former owners' garden area, and for whatever reason, has really bad soil. Maybe it was very intensively planted and never rebuilt with compost or organic matter, but it's never been able to hold moisture very well. So we should have been watering the plants pretty regularly, but for the second issue. We bought over 200 ft of hose, but even that doesn't quite reach the hills. When we'd irrigate, we'd have to get as close as we could and shoot the water up in a big arc, just barely reaching the plants. Probably not the best way to water. Add in frequent rabbit attacks, and by time the big drought came along this summer, it was an easy decision to just let these plants go and prioritize our water elsewhere.

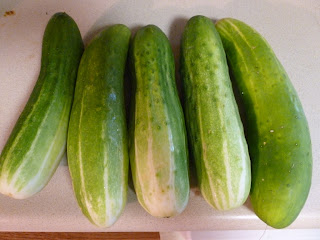
Which was fine, except it meant we didn't have any of these:


And that's where the generosity of our fellow Iowans comes into play. A coworker of Stacia's had way more cucumbers than he could eat, and knew that we were into eating local, healthy produce. So he offered up a batch from his garden. The next week, one of Greg's coworkers had extra cucumbers and brought those into the office to share. Before we knew it, we had a pile of cukes we needed to use!

Some went into cucumber salad, others onto Chicago-style hot dogs, but we were still left with plenty, mostly the bigger, seedier specimens that didn't look as good for fresh use. We knew we couldn't let these go to waste, so we dusted off our trusty canner and took a look at the incomparable Ball Blue Book for a recipe. We settled on Dill Relish, since it wouldn't use the big seeds these particular cucumbers had, and well, because we like hot dogs.

The first step was to get rid of those seedy centers. This was easy enough; just slice down the center and use a spoon to scoop out the centers. You'll notice we also peeled ours since they were pretty big and had tougher skins. With thinner skinned cucumbers, you probably could leave them on.


From there, we just followed the step-by-step instructions in the Blue Book. We've mentioned this before, but it's worth repeating that following the Blue Book is a really good way to go when home canning. Doing it wrong can make you very sick (or worse), so we tend to trust the experts. To make relish we started by finely chopping the cucumbers in a food processor. This was a bit tricky - we had to use very short pulses to make sure we were chopping and not pureeing them to mush. After this we sprinkled the chopped cukes with the prescribed amounts of salt and turmeric, then covered the mixture with water and let it stand for 2 hours.


It didn't look bad, but it wasn't particularly appetizing at this point. Not much changed over the course of the few hours, at least not visually. But we faithfully let it sit this way for a few hours before we drained the liquid off the cucumber solids. This was a good start, but it needed some seasoning to become actual relish. The recipe from Ball called for chopped onions, sugar, white wine vinegar and dill seed. Note that dill seed is not the same as dill weed, and they apparently have a very different flavor. We originally thought we could use the dill weed in our cupboard but had to run out to get a bottle of dill seed at the last minute. We cooked this all together for 10 minutes.


After 10 minutes, it was starting to look more like relish. Still mostly cucumbers but with enough spice, vinegar and chunks of onion that we felt pretty confident it would be tasty. Because of that vinegar the relish was acidic enough that it could be processed in a boiling water canner, not a pressure canner. We had started with about 5 pounds of cucumbers and ended up with 4 nearly full pint jars. Each one sealed with a nice audible POP! but we left them on the counter with the rings on until the next morning. Then we gently pressed on the jar lid to make sure it was sealed and we threaded the rings off. When they were done, they looked like this:


We haven't had any hot dogs since we made these jars of relish, so we actually have no idea how good or not good it might taste. Thus far everything we've made from the Ball Blue Book has been delicious so there's no reason to think that this will be any different. Either way, it was a great way to use someone's excess cucumbers. We did what we could to enjoy the fresh veggies when they were in season, but that time can be pretty fleeting. Canning is a great way to preserve the harvest for later, even if it's not our harvest.


Monday, January 2, 2012

Homemade Apple Butter: Part Two

When we last saw our urban farmers, they had just created a giant measuring cup full of applesauce. Faced with its daunting volume, and with the holidays rapidly approaching, could they transform it into apple butter in time? Or would they be butter off trying to eat it all, and spend Christmas getting sauced?

Fortunately it didn't take us as long to make the apple butter as it did to find time to write about it. Actually, once you've got the applesauce, making apple butter is pretty simple. We followed the recipe from the Ball Blue Book, which is widely considered the gold standard in the world of preserving. Again, following their guidelines helped ensure our canning process was safe from dangerous microbe growth and fit to eat.

We transferred our applesauce into a big (5 quart) saucepot, and added 2 cups sugar, 2 tsp cinnamon, and 1/4 tsp cloves. The recipe originally called for 4 cups of sugar, but with the natural sweetness of our local apples, we decided that 2 cups was plenty. This modification doesn't affect the acidity of the product, so it was safe to do without concern. We cooked the mixture on the stove at a simmer until it was thickened to a spreadable consistency, which took about 15 minutes.


In the meantime, we had been cleaning our canning jars in the dishwasher at a high temperature setting to get the jars hot and sterile. We also put the sealing lids into a pot of simmering (not boiling) water to soften the rims for a good seal. And, of course, we filled our canner with enough water to submerge all the jars, and brought it to a boil. Once all these components - jars, lids, canner and butter - were ready to go, we filled the jars using a funnel to keep the rims clean.


Each jar got a sealing lid placed on top, then a threaded ring to hold them in place. Then it was into the boiling water! We used a handy jar lifter (also sold by Ball) to set each jar into the canner without scalding our hands - careful with that steam as well! Since apples are considered a high-acid food, we didn't need to clamp down and pressurize our canner. A boiling water bath gets apple butter sufficiently hot to kill off dangerous organisms. For low-acid foods, it takes an even higher temperature to do this, so you have to use the pressure canning method. Since we were doing apple butter, we simply set the timer to the prescribed 10 minutes, and waited.


After the ten minutes were up, we carefully lifted each jar out, again using the jar lifter and keeping clear of the steam. Then comes the really fun part! You set the jars on the counter, and wait for them to pop. Each jar makes an audible "pop" once the seal is complete and the jar starts to cool. This can happen right away, or it might take up to an hour. Each pop is exciting, because it means another jar just sealed!

We leave the rings on the jars for 24 hours to make certain that the jars seal. After we take them off, we also double-check the seal by lightly pressing on the middle of the sealing lid and making sure it doesn't flex. If all goes well, it should look something like this:


And that's apple butter! You can label the jars with description and/or date, and stock them away in the pantry. That's right, these are now shelf-stable until opened. For best flavor, you should use them within a year. And probably stock up on bread, cuz you'll want to make a lot of toast if you've got this stuff around!

Wednesday, December 21, 2011

Homemade Apple Butter: Part One

When you've had a good year in the garden, you often can't come close to using up all the produce you've grown. You can try eating Swiss Chard for breakfast, lunch and dinner, but even then you could end up falling behind an overly enthusiastic plant. It would be a real shame to waste this perfectly good food, so when faced with this situation, we turn to preserving, meaning canning or freezing.

Now, as we've well documented, this hasn't been a particularly stellar year in our garden, what with the moving process, the small space allotment we had, and the combination of theft by others and neglect by us. But just because we had a small harvest doesn't mean that everyone else in central Iowa did. One of the many successful growers in our area this year was Iowa Orchard, a neat little fruit oasis in the middle of the Des Moines suburbs.

We're a little ways beyond apple season here in Iowa by now, but we did our best to take advantage of it while it was going on (from July to October, per Iowa Orchard's website). We picked up several pecks of apples over the fall, many for fresh eating, but one peck of Cortlands was specifically earmarked for apple butter.


If you've never had apple butter, first of all, give it a try; it's delicious! But secondly, it's a fruit butter, which is a lot like a jam, but spreads much easier. You can make and preserve it at home with a few simple tools, as long as you follow the right procedure. That is of the utmost importance, since improper canning can make you quite sick or even be fatal. You can follow our process here as a general concept, but make sure you have a trusted manual to ensure you follow the right safety procedures. A good bet is the Ball Blue Book, which we used for our recipe here. Just be careful, and home canning can be perfectly safe.

With that disclaimer stated, the first step in making apple butter is basically to make homemade applesauce, or a nice apple puree. Our recipe called for four pounds of apples to make a half dozen jars of apple butter. We weighed our peck to be about 10 pounds, and it ended up making 14 jars (two separate batches), which is about the same proportion. These needed to be peeled and cut into pieces, which you can do by hand... Unless you have an Apple Master!

It peels!

It slices!

It dices... er, cores!

Our Apple Master was a find at the local TJ Maxx, which made it a reasonable bargain, especially considering that we planned to continue making apple butter in our futures. It helps, but it's not necessary; you can just peel with a knife and then cut into pieces. The apples went into a big pot with 2 cups of water per 4 pounds of apples, where they simmered on the stovetop until soft, somewhere between 10 and 15 minutes maybe. You'll be able to tell when the apples soften, so you likely won't need to time it.


Next we put the softened apples into our second gadget of the process: a food mill. This step could be done in a regular food processor, but it doesn't work quite as well. If you plan to make apple butter semi-regularly, we'd recommend you invest in the food mill. It basically presses the apple slices through a grate in the bottom, which also serves to strain out any skins or tough parts that didn't get Apple Mastered away. A food processor wouldn't have that filtering ability, plus there's the danger that it's too powerful - liquefying the apples instead of making a puree. And it's just so much fun, in an old-fashioned kind of way, to crank away at the apples and watch the mush drip through the bottom.


If you want to make your own applesauce, congratulations, that's pretty much what you've got here! It hasn't been seasoned in any way, and it's still a little too squishy to spread onto toast, so it needs a little more work to become what we want. Come back next time and we'll show you the rest of the journey, where it transforms from puree into the thick, amber goodness of apple butter. We'll also break out the canner, and (very carefully) pack it into shelf-stable jars we can enjoy for months to come. See you then!


Thursday, December 15, 2011

What it All Boils Down To

Mo' fat, mo' flavor.

These four simple words, spoken by Chef Ryan Dowie, quickly became a catchphrase of sorts for those of us studying under him. If he threw a full stick of butter into a pot during class, a chorus of "mo' fat, mo' flavor" would quickly resound from the audience. But maybe we're getting ahead of ourselves...

A good starting point would be to introduce Chef Dowie and explain how the heck we even know who he is. As far as we last knew, he's the head chef at the Waterfront Restaurant in Des Moines, and a part-time instructor at the Iowa Culinary Institute, part of the Des Moines Area Community College. DMACC, as it's known, has a fairly highly regarded culinary program, to the extent that there's a waiting list to even get in to the degree program. Fortunately, they also offered a one-semester seminar course to casual, "non-career" chefs. Last fall, Greg took the class.

Over the course of the semester, we moved from the basics, through soups, salads and breads to the various meats and more, learning the proper preparations for each. But one of the most lasting lessons occurred in the early weeks of the class, and it came in handy again tonight.


Any ideas what we're making out of this? Let's see: bay leaves, pepper, thyme, celery, onions, garlic, carrots, and... a bunch of empty shrimp shells? That's right, baby, we're making stock!

Homemade stock is great - it's as versatile as the boxed stuff, but you get to control exactly what goes into it, so no MSG, preservatives, or other junk. Plus it tastes so much better, and it's a breeze to make. We'll often make chicken stock with leftover carcasses; shrimp is a little less common, but we had been saving shells from several meals-worth of shrimp. Shells come free with the shrimp, so it seems a shame not to use them for something.

The first step is to chop up the vegetables. The good thing here is that the chop can be pretty coarse, since it will be simmering for quite a while (even more so with chicken and beef).


Some folks will just throw these into a stockpot with boiling water, but we prefer to sautee them about 5 minutes or so first. It releases some of the flavors, and it's how Chef Dowie taught it, so who are we to argue? We sauteed in butter, but you could use an oil if you prefer.


We also sauteed the shells for a bit, to start releasing some of their flavorful oils.


 We did this for maybe a minute or two, then added two quarts of water, plus the 2 bay leaves and a small palmful each of pepper and thyme. We don't add any salt at this point, because it's easy to overdo it. As the stock cooks, liquid evaporates off, so the salt could get really concentrated. It's best to just salt at the very end, once the stock is pretty much done.

Then comes the really easy part of making stock. Bring it to a boil, lower it to a simmer, then go watch an episode of your favorite TV show! Well, you can do whatever you like to fill that time, but you're free for about an hour while the stock does its thing, pulling flavor from the ingredients into the liquid.


About this time, you'll probably start to notice that your stock is becoming fragrant, and has taken on a much richer color. Yum! Seeing soup in your future? Only a few steps to go. Now we need to filter out the pieces. All their flavor has gone into the liquid by now, so they're pretty much used up (and ready for the compost bin). We strained through a cheesecloth and a mesh strainer. Be sure the bowl you're straining into is big enough to hold all the liquid.


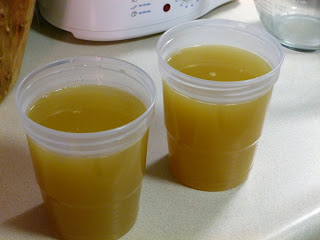
And there it is. Just over an hour, and we've gone from discarded shells to a lovely shrimp stock. We're not planning to use it immediately, so we poured ours into a couple of freezer containers for another day.


Now we're all set to make a shrimp bisque sometime, possibly a gumbo, or maybe some sort of seafood risotto. The possibilities are almost limitless. And it'll feel good to use, knowing we made it ourselves.

This same basic procedure will work for any sort of stock, though the simmering times will vary. Veggie is the shortest, from about 30 to 45 minutes, chicken should go for a few hours, and beef is kind of an all day project. We hope you'll keep this idea in mind next time you're peeling shrimp, or have some leftover bones!