Sunday, June 23, 2013

Homegrown/Homemade Strawberry Jam

It's been a long time since we've posted, so a lot has been happening around the garden. Everything is in the ground by now, and we're starting some harvesting while the rest of the plants just focus on growing. For the most part, we've planted the same things as we did last year, but there have been a few changes, especially with the perennials. One of the most exciting of these is that our strawberries, in their second year, are producing fruit!

Last year we planted 25 tiny strawberry plants in one of our garden boxes, which produced a handful of small berries. By now, they're another year older, and they've had a good rainy spring instead of last year's drought. As a result, the plants have really, well, perked up.


These are Tribute plants, an everbearing strawberry. That means they first ripen in the late spring or early summer, then continue to ripen in six week intervals throughout the summer. So far, it's been a wonderful harvest. Every few days we head outside and pick a bowlful (or more) of fresh sweet strawberries. We eat many of these right off the plant, but it's also nice to be able to save some to enjoy later. So when we picked about a gallon of ripe berries yesterday morning, we just had to do something with them. Here they are, one morning's harvest.


As you can see, we've chopped the berries into quarters, in preparation of making one of the our favorite strawberry items: fresh strawberry jam. Really, this is a simple thing to make, and it's a great way to experience the delicious flavor of these berries months after the harvest is over. The only other things you need are sugar, fruit pectin, and some canning jars. First, you mash up the berries a little to soften them up for the jam.

Then you bring the berries up to a boil, along with the pectin, mixed into about 1/4 cup of the sugar. Pectin is a totally natural product; it's the substance in plants that holds the cell walls together. It's extracted from fruit, and is readily available in grocery and hardware stores, near the canning supplies. As you might imagine, a substance that binds plants together is useful for setting up the gel that you expect in a jelly or jam. Some fruits have plenty of pectin within them, but strawberries are a little light so you have to add the packaged stuff. Here it is, coming up to a boil.


Once this has boiled, you stir in another 3 3/4 cups of sugar, return it to a boil, and boil for one full minute. At this point, there are ways to test for gel, but in our case it was quite noticeable while stirring that the jam was thickening. From here, the jam is simply ladled into clean warm canning jars, placed into a water batch canner, and processed for 10 minutes. That's it!


Once the jars have been pulled out and cooled, they're ready to enjoy whenever you want. For us, we have plenty of fresh strawberries to eat first before we want to crack one of these open, so we'll plan to store them for a little while before we dip into them. That's really no problem; in the sealed jars, the jam should stay fresh for at least a year and probably more. Of course, we did do a thorough job scraping our jam pot clean and tasting the little bit that didn't make it into the jars. It was delicious! In some ways, we can't wait til we get to open one of the finished jars.


This was such a fun project for us. We've canned fruit and jam several times before, often with purchased fruit, sometimes with fruit we picked ourselves, and once with fruit from Greg's Dad's trees. But this batch of strawberry jam marks the first time we've grown the fruit ourselves, picked it ourselves, and processed it into jam. This is homegrown, homemade, and home-canned. Having that kind of connection to our food is only going to make it taste that much better!

One final note, which we would be remiss in not mentioning. We frequently consult the Ball Blue Book for recipes and instruction on how to can, but our real reference guide is the website www.pickyourown.org. This site is an amazing one stop shop for finding pick-your-own farms and tons of canning recipes for how to preserve what you pick. If you have any interest in canning, we definitely recommend this site.

The first jam of 2013 is in the books. We'll see how many more we end up making before the growing season is over. Once you start canning, you just want to keep going!

Monday, April 22, 2013

Thoughts on Earth Day

Today is Earth Day, which is a good reminder to think about how all that we do affects the environment. Many of our projects at You Can’t Eat a Lawn are inspired by a desire to better serve the planet, along with the benefits to our health and pocketbooks. Eco-consciousness is always in the back of our minds, but today is a good annual poke to consider ways that we can do more. For example, it is our goal this year to add rain barrels to our homestead to conserve more water. But before that little project begins, here’s a look at some things we’ve already done with some success that anyone can implement to help the planet.


Compost – Earth Day always features a lot of talk about recycling, but composting is an often-overlooked companion to also reduce our amount of trash generation. Think about what you throw away and how much of it is organic material, or kitchen scraps. Simply piling that material in a bin with air, water and warmth allows it to break down into wonderful nutrients for plants without taking up space in a landfill. This is a double win since it saves you money on buying fertilizers. Even if you don’t have space for an outdoor compost pile, you can compost indoors with a worm bin.

Plant a garden – Walking through the produce section at the grocery store is like taking a virtual world tour. Tomatoes from Mexico or Canada, asparagus from Chile, oranges from Australia. Each one of those items was trucked, shipped or flown to your store, meaning significant carbon emissions into our atmosphere. And because it takes so long to travel that distance, most of this food is picked early and underripe. That’s why a store tomato cannot compare to the flavor of a fresh garden tomato. If you’re a novice, start small. How about a window box or small planter? Maybe start with herbs or greens before graduating to big items like tomatoes and peppers. And don’t worry about failure. We’ve lost more crops than we can count, but we keep plugging away.


Buy a share of an animal – We’ve said it before but it bears repeating that it’s impossible to raise pork chops. The tidy slices of meat you find at the grocery meat counter were once part of a full animal, including the less popular parts. For every chop, there is a pork hock, for every chicken breast, there is a hindquarter. When we buy only the mass-marketed pieces, that means the other portions are wasted. But there’s a silver lining – some of those less desirable parts are the most flavorful. You can’t make a decent split-pea soup without a pork hock, and chicken leg quarters have much tastier meat than the breasts. Factor in that you’re supporting a local farmer, and it makes a half hog or beef even better.

Learn to preserve – Canning is largely a fading art, although it seems to be making a bit of a resurgence. And it’s great for the planet, too. Suppose you get a bumper crop of a certain fruit/vegetable, and you’re absolutely inundated, as we’ve found ourselves to be on more than one occasion. You can try to incorporate that item into every meal, but even that might not keep up with your harvest. Learning to put that food up, either by canning or freezing, keeps you from wasting food. And later on, after the growing season, that preserved food can keep you from needing to buy grocery store produce from far-flung locations.


We could certainly go on with other ideas that can help you celebrate Earth Day and become more self-sufficient, but we don’t want to prattle on for too long. Harvesting rainwater helps protect our waterways and groundwater; incorporating shredded leaves into the garden loosens the soil while preserving our peat bogs; planting trees helps capture carbon dioxide, and if they’re fruit trees, they feed you too. The list goes on and on.

But as we reflect on Earth Day, perhaps the most powerful tool we can think of is to spread the word about what we, and you our readers, are doing. Surely each of us knows a person who says gardening is too hard, takes too much time, or isn’t worth it. Sharing our stories with these individuals, and the world at large, hopefully might lead to a small change. From shopping at a grocery store to a farmer’s market. Tearing up a small patch of grass to grow food. The more small steps like these that we all can encourage, the more of a change we truly can make for Earth Day, and for every day.

Sunday, April 7, 2013

Signs of Spring

We'd almost forgotten what it felt like, but we finally had a nice weekend to get out into the garden! As we've mentioned before, we've gotten a good start on seedlings under the growlight, but we've hardly seen the outdoor garden beds since last fall. So today we headed out back to do a little maintenance and just generally see how things were going. And when we got there, we came upon a few surprises.


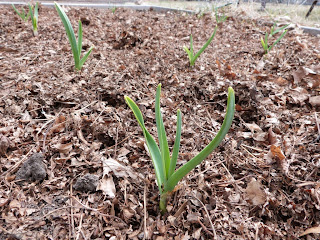
That's garlic, popping up through the leaf mulch we put down when we planted last October. We planted 25 garlic bulbs and have spotted 17 sprouts so far. Some of them are already showing a lot of growth, so we'll just have to keep an eye on them until July or so when they'll be ready for harvest.


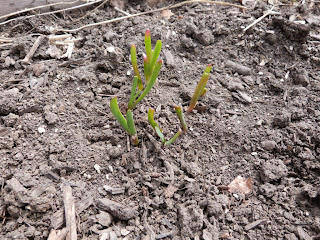
Next we wandered over to the strawberry bed and cleared off the mulch of straw that allowed them to overwinter. Strawberries can handle a bit of a frost, so even if we get a cold snap they should be okay without the straw. Most of the plants from last year look pretty good, but we've also got some new growth like you can see in the picture. This should be where we get our fruit this summer, so it's encouraging to see it doing well already.

While we were clearing straw, we also removed some from around the rosemary (a futile attempt to keep it alive over the winter). And there, we got some even bigger surprises.


It seems our parsley self-seeded when we left it in the ground at the end of last season.


And so did the oregano...


And apparently the chives! This was kind of an accident, since we simply ran out of time to pull all the plants before the winter arrived. So several boxes still had their crops in them by the late fall, when they went to seed. Sometime this spring, it appears those seeds sprouted, and with no work at all on our part, we have a head start on our herb bed. This is about as natural a gardening process as you can have!


Much less of a surprise was this scene: rhubarb starting to poke up out of the ground. This garden is our first time growing rhubarb, but in our zone it's a notoriously robust and hardy plant. Still, it's always a thrill to see that the roots that lay dormant all winter long survived and are starting to send up new growth.


Similarly for this guy - the very start of an asparagus sprout. Our asparagus is a regular green variety, not one of the purple hybrids, but for some reason it's starting off purple. Our recollection is that it did this last year as well before it eventually turned green, so we're not too worried. Last year we had to let all of our asparagus grow out to ferns undisturbed so it was able to store enough energy to last the winter. This year we should be able to harvest for a few weeks before we let it fern out. That makes seeing the first few tips all the more exciting, knowing they should lead to a harvest.

Now it really feels like the gardening season is starting in earnest! Have you started any plants, or seen any overwintered sprouts? This has to be one of the best times of the year.

Monday, March 18, 2013

Broccoli - first seedlings of 2013

What a difference a year makes! At this time last year, we'd already planted some seeds outdoors (radishes and spinach), and were a bit worried we were falling behind on our indoor seed starting. This year... well, it snowed this morning, and we've had to keep the chicken coop enclosed because it's getting down to the teens for overnight lows.

But that will all soon change, which is why we've begun our first indoor seeds of the year. You may recall we built up a big seed-starting shelf, which to this point has only held our mostly unsuccessful indoor lettuce project. That's changed in the last few weeks, as you can see here.


The very early season is prime time for cold-hardy crops, of which our favorite has to be broccoli. Last year we enjoyed some unusual (for us) success with broccoli, and we plan to fill an entire garden bed with it this year. Broccoli can be started 6-8 weeks before the last frost, which in central Iowa is usually mid-May. So, now is a pretty good time to get going. We started some last week, and now they've just begun to sprout.


Of course, we really wanted an early batch of broccoli, so we also started some the week before. They look like this:


And, just because we have a cold frame and a low tunnel, we figured we could take some risk, so we even started some the week before that. They've gotten quite big, and you can see some of the "true" leaves forming.


Our goal here is to stagger our planting so that ideally we can also stagger our harvest. These three-week old plants should form full-size broccoli heads first, then we can successively cut the others so we have fresh broccoli over multiple weeks. When you're growing 32 broccoli heads, that makes things a lot more manageable!

Depending on your zone, it's probably not too late to start some broccoli seeds of your own. Otherwise, the next few indoor plants we'll be looking at are peppers (hot and sweet, probably within the next week), and tomatoes, which we'll plant a few weeks thereafter. It's a great feeling when it's still too cold and slushy outside to see these little reminders that spring isn't too far away after all!

Monday, March 4, 2013

Homemade Polish Kolaczki

Happy Pulaski Day, everyone! If you're from the Chicago area, odds are you know exactly what we're talking about. If not, well, you might be a bit lost. Not to worry, we can explain.

Pulaski Day is celebrated in honor of Casimir Pulaski, a Polish soldier and hero of the American Revolution. You can read all about Pulaski here, but the short version is that he's the father of the American cavalry, and once saved George Washington's life. He's kind of a big deal in the Polish-American community, so much so that Chicago's city offices are closed on the holiday.

Des Moines, though it is a rather diverse city, doesn't have near the Polish-American population that Chicago does. Greg is of mostly Polish descent, so when we decided to celebrate the day, we needed to do so from scratch. We spent yesterday morning making kolaczki (kohl-ach-key, sometimes spelled kolacky), a deceptively simple yet amazingly delicious jam-filled Polish pastry.


See that? That's the dough, deconstructed. Just butter, cream cheese and flour. You start by beating together  three sticks of butter and an 8 oz package of cream cheese until fluffy. Once that's done, you gradually mix in 3 cups of flour, about a cup at a time. This recipe makes about 5 dozen kolaczki. If that's too much for you, it's easy to do proportions and make a smaller batch.


Once the dough is well mixed, it's best to throw it in the fridge for about an hour so it's not so soft. Next, dust your working surface with an even mixture of granulated and powdered sugar, so the dough doesn't stick. Roll out the dough into a thin sheet about 1/4 inch thick.


When the dough is rolled smooth, you next cut it to size for the individual kolaczki. You can use a round cookie cutter if you prefer a more freeform look, or you can use a pizza cutter to slice it into the checkerboard-looking shape we have here. Each square is two inches on a side.

Now for the fun part. Kolaczki are usually filled with jam, but you can use any kind you like. Apricot and raspberry are some of the more traditional options, but there's nothing saying you can't use whatever fruit you like. We opted for the classic apricot and also strawberry. We also used preserves rather than jam, which is a little thicker and might help keep the filling from running out of the kolaczki in the oven.


Place a small (smaller than you think you need) dollop of preserves on the center of each dough square, then fold two diagonal corners up and place one over the other so that you end up with the shape shown here. If your dough doesn't want to stick together, Greg's sister Karin reports that using a little water will really glue the corners together.

These baked at 350 degrees for about 12 minutes, so a batch of kolaczki is done almost before you know it. A good sign that they're done is when the tips of the squares begin to turn golden brown. When they're finished, they should look like this!


If your corners didn't stick perfectly (say you didn't know about the water trick until afterward, like us), you may have some kolaczki that have unfolded. You have a couple of options here. If you're not too picky, leave them as they are. They'll taste just as good! Otherwise, when they're fresh out of the oven, the dough is still a little pliable, so you can try to curl the corners back down. Don't worry if you have a few imperfect ones though - those are the ones you snack on as you go!

The final step is to dust your kolaczki with a sprinkle of powdered sugar, then serve and eat. You just can't beat a homemade kolaczki: the soft, layered crust and the sweet, fruity filling make for a delicious combination. You don't have to be Polish to love this dessert!

If you prefer recipes in traditional format, we mostly followed this one.

Sunday, February 24, 2013

The Snow Birds

It's late February, and here in the Northern latitudes, it's pretty easy to get a little bit of cabin fever. We're at least a month away from being able to do any real work in the dirt, and looking through seed catalogs only gets you so far. Well, it's no different for our chickens, who have been literally "cooped up" since the winter arrived. You can see in this view out toward our backyard that it's hardly chicken-friendly weather.


Of course, the coop, where the chickens spend the night, is well insulated and protected from the elements. We keep it stocked with fresh pine shaving bedding, and try not to open the doors any more than necessary, to keep the wind and moisture out. In theory that should be enough to sustain our hens, but it gets pretty darn cold in Iowa (sometimes below zero overnight). So we opted to add a little more heat in the form of an infrared heat lamp. The light provides heat, while the red keeps it from being too bright and keeping the chickens awake at night.


That takes care of the coop, but the chickens really only spend the night inside there. Most of the day they wander about the run, eating, drinking, pecking and scratching. And our run is constructed of wire mesh, which would let all the snow and wind through. That's a big danger for chickens, since it can cause frostbite. As a result, we've had to create a windblock about the entire run. This we cobbled together from whatever we had on hand, including cardboard, plywood, and used feed bags (which work great). We also covered the top of the run with clear plastic sheeting to keep out the snow yet let in some sunlight.


This setup keeps the chickens safe and protected from the elements, but the downside is that it also makes things pretty boring for them. During the summer they're accustomed to seeing the yard outside the run, munching on bugs that wander in, and also snacking on weeds and scraps that we throw in to them. Most of those are gone during the winter, so we try to provide some interesting enrichment inside the run. This way, even if they have to be inside, at least things aren't too monotonous. This picture shows them crowding around a hanging cabbage - good for extra nutrients, and some excitement as it swings around in response to their pecks. It's just like chicken tetherball!


You'll also notice that the last two pictures have a wall or two of the chicken run uncovered. We do this periodically on nice days during the winter to let a little fresh air in and to let the chickens enjoy some scenery. Days like this are somewhat rare during an Iowa winter, but when it's relatively warm and calm, it's nice to take advantage of it. In the future we're hoping to build a larger fenced area that can be utilized on nice days for some supervised "free-ranging." After all, our chickens can get by while being cooped up, but we do what we can to relieve their cabin fever too!

Friday, February 15, 2013

How Low Can You Go?

February is such a tempting time of the year.  It's still cold, but spring feels like it’s just around the corner, and we are anxious to get things rolling.  One of the big things that we want to do to increase how much food we grow in our backyard is to lengthen the growing season.  If you simply rely on Mother Nature, the frost-free date in central Iowa isn’t until May 10th.  We aren’t willing to wait that long, so we’re taking matters into our own hands.

Last year we built a cold frame and we plan to use it again this year.  This season we’ve decided to also try a low tunnel.  A low tunnel is essentially the same thing as a cold frame, just a different shape, and the end goal is the same.  It’s a small structure that uses the greenhouse effect to warm the soil and protect plants from the cooler outdoor temperatures.

Lots of places sell low tunnel kits, but we thought it looked simple enough to just build one ourselves.  We even found this great example.  We picked up a few supplies, and built this handy low tunnel in just a couple of hours.

To anchor the low tunnel, we used 6-inch long pieces of ¾-inch diameter PVC fastened to our raised beds.  We drilled a couple of holes through one sidewall of each piece so that we could fit the head of a screw through it.  Then we simply screwed these anchors to both sides of our raised beds spaced about 2 feet apart.


The basic structure of the low tunnel is arched pieces of ½-inch diameter CPVC (chlorinated polyvinyl chloride) pipe.  We looked at regular ½-inch PVC first, but the CPVC was more ductile and only a little more expensive.  It would be easier to bend the CPVC into a hoop shape without cracking it, so we decided it was worth a little extra cost.  The CPVC was sold in ten-foot long sections, but that made the low tunnel a little too tall.  After cutting each piece down to nine feet, the height looked much better.


The ends of the CPVC hoops slide right into the PVC anchors.  Next we added a “spine” of ¾-inch PVC across the tops of the hoops to help make the low tunnel a little more rigid.  The spine is fastened to the hoops with just a couple of plastic cable ties.


The last step was to drape a sheet of 6 mil plastic sheeting over the PVC “skeleton.”  The sheet of plastic should be large enough to reach all the way to the ground on all four sides of the low tunnel.  We’re holding the sheet of plastic to the ground with some landscaping blocks and railroad ties that we had lying around the yard.  This traps the heat inside the low tunnel and stops the wind from blowing our plastic sheeting away.


One really nice thing about this design is that we can always add anchors to our other raised beds so that we can move the low tunnel to any garden box we choose.  This low tunnel should be an easy way to start our veggies earlier in the spring, and keep growing things later in the fall.  It’s a simple and inexpensive way to stretch the Iowa growing season and produce even more fresh food!

Friday, February 8, 2013

Hibernation over!

You may have noticed that we haven't exactly been around here a lot lately. Perhaps unsurprisingly, our disappearance began around the holidays, during a time when we do a lot of traveling to make sure we visit both sides of the family. But then, we kind of never came back. We can blame that on winter being a slow time of year for gardening, or whatever sounds the most plausible. The truth is, we got a little lazy. And the worst part is, it wasn't just with the blog, we slacked off on our garden work too.


Remember these guys? Our little winter project to try to grow lettuce? Well, it's a little hard to determine how well that experiment turned out, since we basically stopped watering them. It turns out lettuce, especially baby lettuce, likes water. Who knew? In a remarkable feat of plant kingdom fortitude, a few of our plants survived, as you can see in the picture, though none of them did much growing. Hopefully that will change soon, because of an exciting new addition to the farm.


That's the new and improved seed-starting and indoor growing shelf. It's four feet wide, which accommodates a full-length shop light and two plant trays. And it's about six feet tall, which means at least three, maybe four shelves of plants growing on it, depending on how we space them. We have the one light fixture that we used last year for seed starting, and purchased (but haven't yet set up) a second. So far we are growing some columbines from seed, the remains of the lettuce experiment, and a reboot of indoor greens with spinach this time. So far the spinach seems to be doing okay, though you can tell it's still very young.


This go-round, we're being much more diligent in our watering, and we've incorporated some plant food (fertilizer) since the storebought growing medium doesn't have much in the way of nutrients. We'll see if we can actually grow something worth harvesting indoors when it's only about 35 degrees outside.

Which is all well and good, but the grow-shelf is going to get a lot more crowded in a few weeks as we begin to add our seed starts for the outside garden. Last year we planted broccoli seeds indoors in late February, and got a simply amazing crop after we transplanted them outside. Broccoli is one of our favorites, so we hope to do at least that well this year. And then we'll have to start peppers, and tomatoes, so it should become a very busy shelf unit.

It's hard to believe that the gardening season is starting and it's only February, but it's what we've been waiting for all winter. And now that things are getting going again, hopefully it will kick us out of our stupor and back into growing again!