Sunday, June 10, 2012

A Visit to the Berry Patch

It's June in Iowa, and that means one thing: it's strawberry season! You might remember we planted our own strawberry plants earlier this spring, but they likely won't produce any fruit at all in their first year. But we didn't let that deter us from taking advantage of the season so we did the next best thing.


A local pick-your-own berry farm! Berry Patch Farm is another producer that we first met at the downtown Des Moines Farmers Market, and we liked their produce so much that we decided to drive the 45 minutes to their farm north of Des Moines. It was going to reach 90 degrees by the afternoon, so we got out there right when they opened at 8 AM. Apparently we weren't the only people with that idea...


The friendly farmers directed us to a strawberry field that was ripe this weekend, and gave each of us a row to start picking. They also provided containers, ranging from individual pints up to 10 pound flats. As you might imagine, we opted for the latter.

Now, you can't really see any strawberry plants in that picture of the field. That's because strawberries grow very low to the ground, and some opportunistic weeds are towering above them. To get to the berries, you have to bend, stoop, or outright crawl along the rows. It's also a good idea to wear long pants, and maybe even long sleeves. Even though it's hot, wading through the weeds can be irritating to your skin. But it's worth it when you find a clump of strawberries that looks like this:


These locally grown strawberries are almost nothing like the ones you buy at the grocery store. The skin is ruby red, and the flesh is velvety soft and sweet. The berries were so sweet that the whole field gave off a sugary aroma. We picked a few, then tried a small sample, and then really started picking to get as many of these luscious berries as we could.


We spent about an hour in the field, and these were the (literal) fruits of our labor. We pretty well filled the flats, ending up with 18 pounds of red ripe strawberries. After that work, we were ready to head home and enjoy our harvest. Now, we're always up for a challenge, but 9 pounds apiece is a bit much for even us to eat fresh. But one of the key parts to getting produce in season is finding a way to store it to enjoy year-round.

Strawberries can be made into jams or jellies which would be put up in cans for later. We've done that before, but this time we decided we'd rather freeze them whole. We've lately been enjoying homemade smoothies with other frozen fruits, and these delicious strawberries seem like a good fit for that too. Otherwise, frozen berries can still be used for pies, sauces and many other things.


Freezing strawberries is pretty simple. We cut out the hulls (the top center part of the berry where the stem is attached), rinsed the berries under cool water and patted them dry. Then we stood them all up on a lined cookie sheet without letting any of the berries touch. We put that into our chest freezer for 3-4 hours to get them partially frozen.


We then tossed the berries into ziploc bags for long-term storage. We needed that initial freeze to keep the berries from sticking together in the bags; this way we should be able to pull out a handful at a time to make our smoothies. We'll freeze a little more than half of our haul, and find lots of ways to eat the fresh ones over the next few days. Until we have our own plants, there really is no better way to get fresh produce than going to a pick-your-own farm, and Berry Patch sure is a nice one!

This post has been shared with Simple Lives Thursday.

Friday, June 1, 2012

May Harvest Update

As we were scurrying about this morning getting ready to leave for our day jobs (not farming), Greg glanced out the back window and was greeted with this view. Our garden always seems bucolic and peaceful, but on this crisp morning it just looked so nice we had to stop out and visit for a few minutes.


Most of the plants - those that haven't been attacked too badly by our neighborhood rabbits - looked very good. Our broccoli is starting to form heads, which is a really encouraging sign. Two years running we've lost our entire broccoli crop either to bolting or to animals, so we're excited about any possible harvest. We haven't gotten any yet, but we're hopeful.


The one area where we have been harvesting quite a bit is our greens and radish box. This box was planted with 1/3 spinach, 1/3 radishes, and 1/3 various lettuces. By now all the radishes have been pulled, but the others are still going strong. From the start of the season up to the end of May, we've harvested:

 - 70 radishes, each about 0.6 ounces, for a total of 2 lb 10 ounces
 - As many radish greens as we cared to eat; the rest went to compost
 - 5 ounces of garlic scapes, the flavorful shoots that appear in the spring
 - 1 lb, 10 ounces of baby leaf spinach
 - No significant lettuce or mache


Now, you can see there is plentiful lettuce growing here, but we've chosen so far not to harvest it. Based on a few nibbles here and there, we've discovered that our leaf lettuces are incredibly bitter! Some quick internet research seems to indicate that it's either soil nutrient deficiencies or inconsistent watering, but we're just not sure yet. Any experience our readers have in growing lettuce that isn't spit-it-out bitter would be greatly appreciated.

Oh, and our chickens haven't produced a thing for us yet, but they are still really cute and fun to play with. They love to eat the plentiful clover that grows in our yard, and they trust us now enough to eat it right out of our hands.


All told it's not a ton of food just yet, but we can see that a lot of plants are getting close to harvest stage. The broccoli we mentioned, as well as kale and snap peas, should be ripe within a week or two. Plus we've been eating spinach and radishes in almost every home-cooked meal this month, from salads and sandwiches to spinach pizzas and oven-roasted radishes. They taste great, we know they've been naturally grown, and we eat them fresh-picked straight from the earth.

How's your garden looking so far this year? Hopefully it's been a bountiful harvest all around and it continues into the rest of the gardening season.

Saturday, May 26, 2012

How to Shop a Farmer's Market

Here on our farm, we like to grow as much of our own produce as we possibly can. But before we had land of our own, and to supplement what we harvest here, we love farmer's markets. They are a fantastic source of local, in-season food that you just can't get at the grocery store. Often times, the veggies are picked earlier that same day, so it can hardly get much fresher.

But if your local farmer's market is like Des Moines' (i.e. huge) and you've never shopped at one before, things can be a bit... intimidating.


Where do you begin with so many vendors and crowds of shoppers? Well, have no fear; as multiple-year veterans of farmer's market shopping, we're here to share some of our favorite tips.

Tip #1. Get there early. The downtown Des Moines Farmers Market runs from 7AM to noon, but you'll never catch us arriving much past 8. Sure, there is fun to be had strolling around and munching food from the prepared food vendors later in the day but your selection of fresh produce will have been diminished. The farmers bring a certain amount of their crops and when they're out, they're out. So for the freshest produce and meats available, plan to get there as early as possible. For us, 7 is pretty hard to do on the weekends, but we can typically manage 8AM or so.

Tip #2. Fuel up. The "experts" say you should never shop on an empty stomach or you'll end up buying too much. To us, that hardly seems like a bad thing at a farmers market, but the advice still holds since you'll be doing a lot of walking. Plus, most farmers markets have a nice selection of prepared foods as well as fresh produce, so you can buy yourself a treat to nibble as you do your shopping. Des Moines has everything from breakfast burritos and sandwiches to egg rolls, pupusas and samosas, but our favorites are the Austrian pastries from the Strudl Haus. Find something that looks tasty, and get that first to power you through your shopping.


Tip #3. Get to know some farmers. Most farmers markets are populated by the same vendors week-to-week. If you find a vendor who consistently has tasty, fresh produce or always takes the time to answer your questions about their farm and practices, it might be nice to "vote with your dollars" at that stand. As farmers market veterans, we've now got a pretty good routine of our favorite farmers that we always make a point to visit and see what they've got. In fact, this was also how we ended up getting a half hog a few months back; we'd previously purchased individual cuts of pork from Crooked Gap and knew it was delicious and sustainably raised. When we opted to buy a half hog share, we knew exactly where to look.


Tip #4. That said, don't get stuck in a rut. Most vendors are the same every week within the season, but there is some turnover of market spots at the start of each season. So even though we may have a mental list of farmers we want to visit in any given week, we don't limit ourselves to those. Just last week we discovered Yang Homegrown Vegetables, a farmer we'd never seen before, and who had some of the best looking organic rhubarb around. We bought a few bunches and now their stand has become part of our planned rotation for the rest of the season.


Tip #5. Figure out what's in season, and buy that. Compare the above photo of Yang's produce with the picture below of another vendor just a few stands over. Both have beautiful looking produce, but there is one pretty big difference.


When these photos were taken, in mid-May, some vegetables are in season, and others just aren't. Yang's radishes, onions, rhubarb and greens are common early-season crops. The other stand has bigger-than-expected broccoli and cauliflower, but even more questionably they already have bell peppers. In Iowa those shouldn't be ripe until the late summer so you wouldn't expect to see them just yet. This particular stand is especially brazen, leaving the grocery store stickers on the peppers, so there's really no question that these are not locally grown. Most vendors aren't out to trick you, but simply being aware of when different vegetables ripen in your area can be helpful. This website is a pretty good resource, but keep in mind these are estimates only. This year a lot of vegetables have ripened much sooner than they seem to think.

Tip #6. Feel free to ask questions. If you can't tell whether something is in season or not, or if you're wondering anything else about the food that you see, go ahead and ask. One plus to shopping at farmers markets is that the farmers themselves typically work the stands. This means that they know what they're selling, and can tell you all about it. Anything you want to know, from identifying a plant you've never seen before to knowing if the farm is organic, chemical-free, or conventional can be answered with a simple question. No one will make fun of you for not knowing, and most farmers enjoy talking about their food with someone who really wants to know.


Tip #7. Don't be afraid to try something new. You can go to a farmers market and buy locally grown versions of the same food that you can find at the store, but that's only part of the fun. Farmers love to experiment with different varieties, and many unusual items are typically on display at the market. If you see something eye-catching, ask what it is and how to prepare it, and then why not give it a try? In the past, we've gotten these interesting looking dragon tongue beans, plus a range of items as diverse as purple potatoes and actual Iowa-raised tilapia. Not every one will be a new favorite, but it's part of the fun to check out a new taste.


Tip #8. Have fun! A farmer's market is a great opportunity to try new things, support local farmers, and enjoy great food. These tips can make your trip more successful from a shopping perspective, but don't worry about following them to the detriment of the experience. Our collection of tips is built up from years of experience shopping at farmers markets, and we still don't always do things perfectly efficiently. But we do always have a great time, and we're sure you will too if you give it a try.

How about you? Any particular tips or habits you follow when you shop at the farmer's market? What's your favorite thing to buy at the market?

This post has been shared with Simple Lives Thursday.

Sunday, May 20, 2012

Home Tweet Home


As our chickens have been growing quickly over the past few weeks, so has their backyard home. We showed you the original concept for the chicken coop several posts ago, but now we can show you the real thing!

First we chose the spot where we wanted to place the chicken coop. We took some time to level out the soil and placed some landscaping pavers under our floor sections. Leveling the soil helps the rest of the coop stand up straight, and the pavers should keep the wood from being in direct contact with the soil, which would cause it to rot.


The wall pieces were actually assembled in our basement over the winter, so that step went pretty quickly.  We just laid out the walls, stood them up, and fastened them together. We're glad we took the time to build these last winter, because it was a big time-saver during construction.


After the walls were standing, we raised the roof! Both literally and figuratively. This step was a little tricky just because the roof was a large, heavy piece that we needed to lift 8 feet off the ground. That required two people, each with their own ladder, to lift the roof and climb the ladders in synchronization.


Things really started to look like a chicken coop after we attached the sheathing, windows, and door. That's the same charming, used door that we picked up at the ReStore several months ago. It looked much better after a fresh coat of paint. The sheathing is just several sheets of OSB (oriented strand board) that we cut to the proper size for each wall.  We installed the windows backwards, so that we can open them from the outside. This allows us to get some air flow through the coop to provide ventilation and keep the temperature down in the summer.


It's important to keep the chicken coop dry, so we took lots of care to seal up the roof using roofing caulk. We even laid down tar paper and asphalt shingles. We hadn't shingled anything before, but luckily the internet can teach you to do anything! This handy YouTube video was a great resource for us. The coop has been through a couple of rain storms already and we haven't seen any signs of a leak.


It required a lot of discussion at the hardware store, but we finally settled on the perfect shade of blue to paint the outside walls of the coop. The color pairs nicely with our bright compost bin, and has just the right amount of country charm with a little seaside flair mixed in.


The outdoor run is covered with 1/2" hardware cloth (wire mesh) to keep the chickens in and most importantly to keep predators out. You might think that we don't have to worry about predators in our urban neighborhood, but that's not the case. Cities have lots of animals that can harm chickens, including raccoons, foxes, hawks, and domestic dogs. We haven't finished this yet, but we'll bury the hardware cloth around the perimeter of the run to keep animals from digging under it.


Now that they are fully feathered (about 4-5 weeks) the ladies (plus Frenchie) have moved out into their new home. They were a little nervous about it at first, but now they seem to be settled in nicely. As far as we can tell, they like their new coop better than their old cardboard box.


This chicken coop was a lot of work, but we are thrilled with how it's turned out. The two of us didn't really have much carpentry experience, but by taking it one step at a time, we've built an attractive coop that will keep our backyard flock healthy and safe for many years.
This post has been shared at Simple Lives Thursday.

Monday, May 14, 2012

One of These Things is Not Like the Others

You may remember our adventures in chicken-keeping began with three tiny black and white fuzzballs. They started out all looking the same.


Over time, though, they began to get some differences in coloration and eventually personality that helped us tell them apart. The two Barred Rocks in this group picture are the black chickens with white or gray markings. You can see that Liza in the foreground looks much darker than Frenchie just behind her, even though they're the same breed.


In fact, in a lot of ways, we started to think that Frenchie looked a bit, well, different.


By three weeks old, we were pretty sure we knew what it was that made Frenchie different. At this age Helga (the other Barred Rock) was still mostly black with a smattering of white speckles. She'd also developed a small comb on the front of her face.


Frenchie, on the other hand, had become almost entirely striped, with a larger comb and big thick legs.


And boy was Frenchie bigger than the other chicks!


This meant that the trouble with Frenchie was... that she was a he! Yes, we have ourselves a bona fide rooster. It turns out that determining the sex of a day-old chick is not so easy. The hatchery from which we'd gotten our chicks promises 90% accuracy, so when we ordered 10 hens we knew this was a definite possibility. There aren't always such early plumage differences between males and females, but this particular breed does begin to show differences at a young age. The size difference, the bigger comb and the thicker legs are also pretty universal indicators that it's a rooster.

Unfortunately, keeping backyard roosters is not a great idea in an urban area. Technically it wouldn't be against the chicken laws, but once a rooster starts crowing every morning (and throughout the rest of the day) the noise ordinance complaints can pile up in a hurry! We want our neighbors to like our urban chickens, so Frenchie is going to have to find a new home.


Luckily we have a little time before Frenchie gets too vocal. Right now we're following several leads, including some friends with a legitimate nice farm in the country where he could live. And we actually mean that, we're not talking about a "nice farm in the country."

This brings our flock down to a group of nine, since none of the others look very rooster-y just yet. We'll still keep a close eye on them in case there are any late bloomers, but for now we're pretty optimistic. In the meantime feel free to let us know if you know anyone who needs a rooster!

Monday, May 7, 2012

Summer Vacation Takes Root

As a couple with a predisposition toward all things growing, we don't exactly take typical vacations. It started pretty innocently with our trip to Sonoma Valley that resulted in us bringing wine home by the caseload, and has kind of snowballed from there. It's always fun for us now to try to bring home some of the local flavor of whatever region we're lucky enough to visit. Last summer that involved a trip to Wisconsin's Door County, an area famous for its cherry orchards.


Neither one of us really knew how much we loved tart cherries until we arrived at Choice Orchards and started picking. Having arrived right at the peak of the cherry season, the orchards were loaded with bright red fruits. They were tangy and juicy, and effortlessly pulled off the trees by the handful. We didn't stop until we'd filled several buckets.


When all was said and done (after two trips to the orchard), we ended up bringing home a whopping 35 pounds of cherries. What we did with them is perhaps a tale for another time, but we were certain of one thing: we absolutely wanted to grow this fruit in our own backyard. We didn't actually have a backyard at the time, but we do now! We ordered a dwarf Montmorency cherry tree from the Arbor Day Foundation this spring, and this past weekend it arrived on our doorstep.

Inside the package, our bareroot tree was packed with moist paper around the roots, and it looked like it had handled the trip well. We placed the tree in a bucket to soak, and got started digging. We cut a circle of sod about 3 feet in diameter, then dug the hole about 12 inches deep.


After soaking the roots for 3 hours, we centered the tree in the hole. We started with a small mound of soil at the base, to support and spread the roots. Then it was simply a matter of filling in the hole with the material we'd just dug out. It's tempting to add some enrichment to this soil, but you're actually better off leaving it as-is. This will encourage the tree to send out long, strong roots to find lots of nutrients. We gently firmed the soil as we went, being careful not to pack things down too much. When the soil around the tree was just about two inches below the surrounding ground, we stopped. This creates a basin in which water can collect to help keep the tree hydrated.


Finally, we covered those remaining two inches with a nice layer of mulch. In addition to looking nice, this is a permeable material, so rainwater can filter through the mulch into that aforementioned basin. We gave the tree a good soaking from the hose, which should be sufficient for a while unless we get a really dry snap. In that case, we can water about once a week to ten days, during the first year.


That may not look like much more than a stick in the ground right now, but we have high hopes for it. With any luck it will be producing fruit within three to five years. We'll have to do some pruning to help develop the proper shape and we'll keep an eye out for fruit tree diseases and pests. We might not get 35 pounds of cherries out of our one tree every year, but it's a lot closer to home than Door County.

This post has been shared with Simple Lives Thursday.

Monday, April 30, 2012

Getting Bigger Everyday

We know, we know.  We are long overdue for a chicken update.  We’ve been doing our best to keep up with our little ladies but it’s been tough.  It’s just amazing how fast they grow!


They started out in a cardboard box that was about 2½ feet by 2½ feet.  We expected that to hold them for a while, but it turns out that we vastly underestimated them.  The three Plymouth Barred Rocks, our older chicks, quickly became curious about the world that existed outside of their cardboard box.  By the time the Barred Rocks were two weeks old, Helga made a very impressive escape attempt that was only thwarted because we happened to be standing right beside the box to corral her.

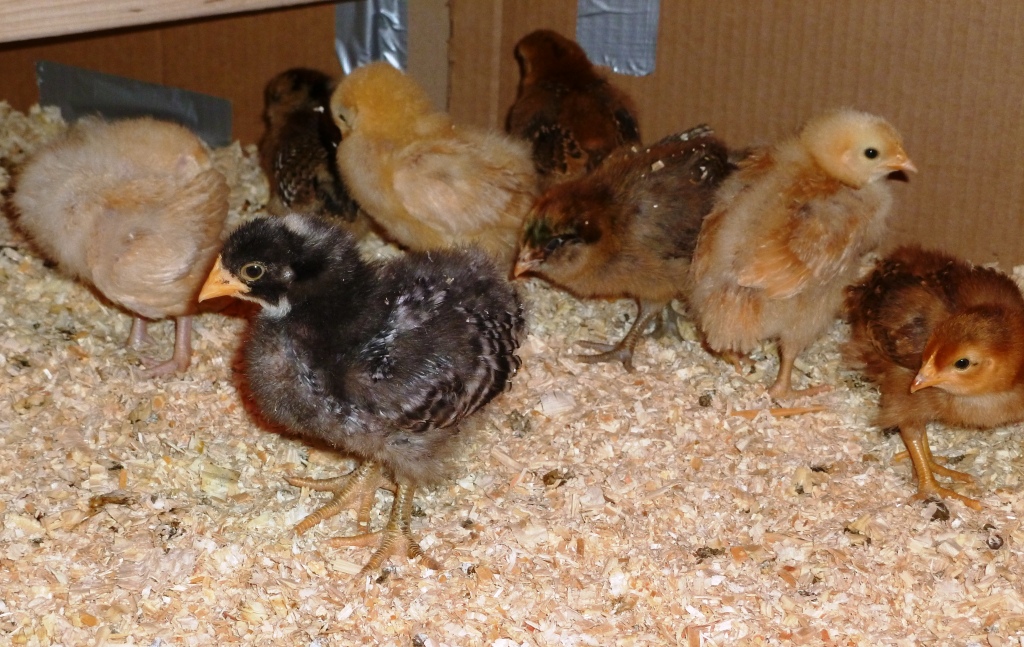
So they’ve since been relocated to a much larger cardboard/duct tape Franken-box that should (hopefully) hold them for a few more weeks.  As of this post, the Rhode Island Reds (red chicks), Buff Orpingtons (yellow chicks), and Easter Eggers (grayish brown striped chicks) are two weeks old and the Plymouth Barred Rocks (black and white chicks) are almost three weeks old.


Their appearance changes every single day, as they are gradually replacing their fluffy down with real feathers.  Most of the real feathers are showing up on their wings and tails, but the Barred Rocks are beginning to get feathers on their necks and backs too.  Their feet have gotten much bigger and they are starting to develop combs on the top of their heads.


And their behavior is just hilarious!  Our chicks peck and scratch at the bottom of the box almost constantly.  Then suddenly, without any warning or reason, one of them will sprint across the box flailing and flapping her little wings.  We’ve also been seeing some power struggles.  These mostly involve two chicks stretching up tall, puffing up their chest feathers, and dancing around in circles.  They’ve pecked at eachother a little, but none of their squabbles have gotten bad enough for us to intervene.  They are just working out their social order to decide which chicken “rules the roost.”

The chicken coop is really coming along now, but we’ve still got lots to do before the chickens can move in.  The walls are all standing and we’ve just about completed the exterior sheeting.  We’ve even had a couple of neighbors ask us about it.  It’s been fun to see their reactions; which have mostly been a mixture of confusion, surprise, and amusement.


So far keeping chickens has been loads of fun.  Building the chicken coop has been lots of work, but I think we’ll be pretty happy with it when it’s finished.  We’ll try to do a better job of keeping you all posted on the happenings with our little gals in the upcoming weeks.